Adjust Values from Tool Tip Panel
The Tool Tip panel provides a means for modifying the values of those Attributes that have been set up with the "Quickedit" feature in your User Settings.
To modify the value of an Attribute in the Tool Tip panel:
Ensure that you have a Case opened in the Display panel.
Locate the Element containing the Attribute value you want to change.
Usually this is done as you are reviewing an Element in the Display panel.
Display panel - Element Tool Tip panel

Without pressing the mouse button down, roll over and stop on top of the Element's image.
A Quickedit panel displays, as shown in Figure 1.
Click on the Select a Quickedit down-arrow to display the list of Attributes that have been set up for quick editing, as shown in the following figure.
Quickedit list
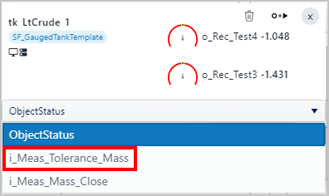
Click on the Attribute for which you need to modify the value.
The panel expands to display the current value, Comment box and Edit button, as shown in the following figure.
Edit an Attribute's value in Quickedit panel
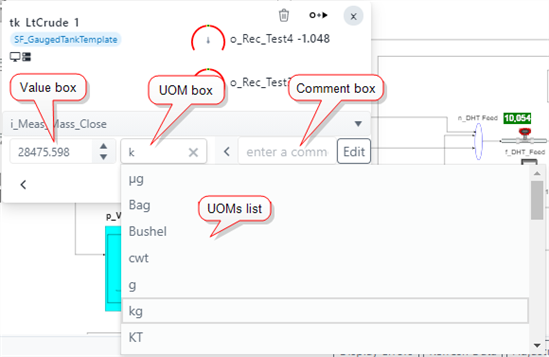
For values that allow quick edits on values other than Object Status, three input boxes are displayed; one for value, one for unit of measure (UOM) and one for a comment.
Click in the Value box and type the new value you want to apply.
If the value supports a Unit of Measure (UOM), the UOM box is displayed.
Click in the Unit of Measure box and either type the UOM or press the space bar to display a list from which you can select the UOM.
NoteThe new value can optionally include a unit of measure abbreviation at which the value is related. In such a case, the value is converted to the default unit of measure configured for the attribute. If the new value does not include the unit of measure abbreviation, the value is assumed to be related to the default unit of measure of the attribute, and therefore, no value conversion is made.
(Optional) In the enter a comment box, type in a reason for the adjustment you are making.
Click the Edit button to temporarily save your change.
Click the Close icon in the panel to close it.
Your change is immediately reflected in the Display panel. However, you must do a 'Checkin' if you want to save your change to the database.