Run a Case Analysis
You run a Case Analysis from the Workflow sub-panel in the main Workflow panel.
Click the
![]() Workflow icon in the command bar to
access the Workflow sub-panel.
Workflow icon in the command bar to
access the Workflow sub-panel.
Workflow Sub-Panel
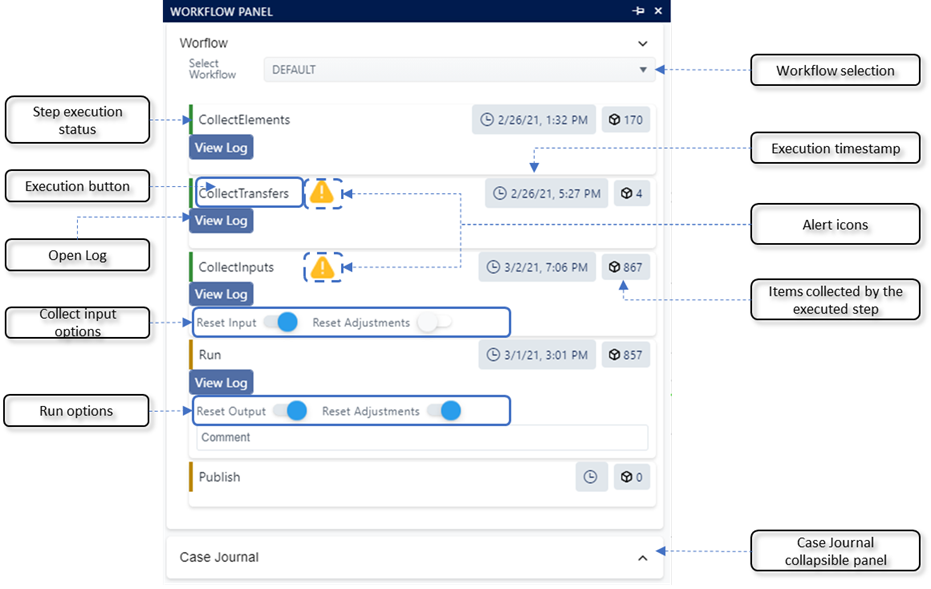
The Workflow sub-panel provides all the actions required to execute a Sigmafine Case Analysis. Figure 1 shows the organization of the actions in the Workflow sub-panel.
Workflow Panel
The following table provides descriptions of the various workflow steps and actions.
Workflow Sub-Panel Steps and Actions
| Action | Description |
|---|---|
| Workflow selection | SFHub Visualizer can manage multiple workflows according to the configuration defined in the SFHub Studio Settings. Version 1.5 of SFHub Visualizer supports only one workflow (DEFAULT selection), reflecting the standard Sigmafine Case Runner steps. Version 2.0 of SFHub Visualizer allows you to broaden the creation of workflows, in order to extend the Sigmafine Case executions with additional actions (e.g., SFHub Studio Analytics). See [SigmafineHub Studio Settings](../../SF-STUDIO/Stud ioSettings/studio-Settings-intro.htm){ma dcap:conditions="General.OnlineONLY"}the "SigmafineHub Studio Settings" chapter in the SigmafineHub Studio User Guide, for instructions on how to configure workflows. |
| Step execution status | A colored bar on the left side of an action indicates the execution status of that workflow step action: Yellow bar indicates that the step has not yet been executed, or that it has been invalidated as a consequence of an action. Green bar indicates that the step has been executed |
| Alert icons | An alert icon is shown by SFHub when the managed mode is enabled. When the alert icon appears on the Collect Transfers or Collect Inputs workflow step, it indicates that the step needs to be re-executed, due to a data change in the system. Collect Transfer changes that cause an alert icon: - A new transfer has been created in the Sigmafine database and its time range falls in the Case time range. - An existing transfer has been changed (Start / End Time or Source / Destination). Collect Inputs changes that cause an alert icon: - An attribute value has been changed (adjusted) and its new value affects one or more input attributes to the analysis. - A transfer attribute value has been changed either in the Sigmafine database or in the Sigmafine Case. |
| Execution timestamp | A timestamp that indicates the time at which the workflow step was executed. There is no timestamp for workflow steps that have not yet executed. |
| Execution button | The button that allows you to execution the workflow step. |
| Execution step items | A counter indicator that displays the number of Items collected by the executed step. The type of items varies depending on the workflow step. Collect Transfer: The items counter shows the number of transfers collected in the selected Case. Collect Inputs: The items count shows the number of input results collected in the selected Case. Run: The items counter shows the number of output values generated by the Sigmafine analysis and recorded in the selected Case. |
| Open Log | After a workflow step has been executed, a View Log button appears in the panel under the step. When clicked, it opens a panel showing the AF Server log messages generated by the executed Sigmafine analysis step. |
| Collection input options | A set of options used by the analysis Collect Inputs step, to execute some preliminary steps prior to the creation of the inputs on the Sigmafine Case. The available options are inherited from the selected SFHub Visualizer Setting. A toggle allows you to select whether or not to use each option. Reset Inputs: Instructs SFHub to reset all the collected inputs before the new collection is built. Reset Adjustments: Instructs SFHub to reset all the adjustments previously created on the input attributes. |
| Run options | A set of options used by the analysis Run step, to execute some preliminary steps prior to the creation of the outputs on the Sigmafine Case. The available options are inherited from the selected SFHub Visualizer Setting. A toggle allows you to select whether or not to use each option. Reset outputs: Instructs SFHub to reset all the existing outputs before the new collection is built. Reset Adjustments: Instructs SFHub to reset all the adjustments previously created on the output attributes. |
Run the Case Analysis
The Workflow sub-panel (Case Runner panel) in SFHub Visualizer allows you to run the required steps of an analysis on the Case you currently have open. There is a standard order in which the steps are usually run, though you can rerun a step as necessary. The order of the steps is as follows:
- Collect Elements: Establishes the elements to include in a case, based on their inclusion the case/display.
- Collect Transfers: Locates any transfers to include in a case, based on the transfer s' time and whether it is connected to any elements in the case.
- Collect Inputs: Collect all inputs for the analysis to use in running the case.
- Run: Run the analysis for the current case.
- Publish: Send output results of the analysis back to the attributes' configured data source.
Note that should a step fail to provide the expected results, it usually requires adjustments at least one time or possibly multiple times, until the step provides acceptable results. For this reason, the first three steps can always be rerun prior to performing the actual 'Run' step. Determining if a step has completed successfully can be accomplished by viewing that step's Log file.
Should you select a step out of order, based on the Case Runner Properties options you have selected in your User Settings, the previous steps automatically run.
For more details on making adjustments see Adjust Element Attribute Values.
To run a Case Analysis:
Ensure that you have a display opened in the Display and a Case loaded.
Click on the
 Workflow icon to open the
Workflow panel.
Workflow icon to open the
Workflow panel.Workflow main panel
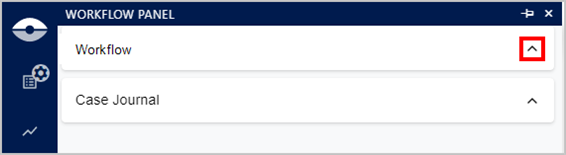
If not already open, click on the Workflow arrow to open the Workflow sub-panel.
Workflow sub-panel - Case Runner workflow steps
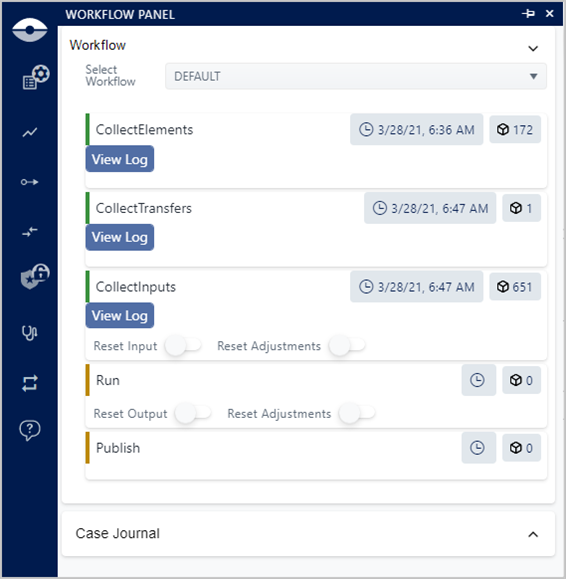
The panel displays the five steps involved with performing an analysis. You can determine whether a step has already been run by the color bar to the left of each step. If the bar is green, the step has been run. If the bar is gold, the step has either not been run, or has been run but is not valid due to other subsequent actions.
When a step has been run, a 'View Log' button appears below the step, that allows you to view the execution log for that particular step.
To execute a step, click on it.
When running the Collect Inputs and Run steps, the default is action for Inputs, Outputs and Adjustments is based on what is set up for your individual user settings. (Note that each user has their own settings.) If there is no default action set for you, SFHub Visualizer automatically disables Reset Input, Reset Output and Reset Adjustments features. To automatically set up your default to disable the reset of any of these features, you can set "disable" as your default. When you disable a reset feature in this panel, it only applies for this one-time run of the step.
- To disable a reset of the Inputs, Outputs and/or Adjustments drag the blue circle to the left until it turns gray.
After a step completes, a log access button displays for the step.
To view the log for a completed step, click the View Log button.
The Log panel opens.
Log panel example

When the log message contains a reference to the name of an element, the SFHub shows the message as a hyperlink. Clicking on the hyperlink triggers SFHub Visualizer to locate the element on the display; the tool-tip panel of the element enables you to initiate further actions (e.g., create an adjustment using the quick edit feature).
Should the step's Log show that an issue or error has occurred during the run, you may need to make some adjustments and then run the step again. This process can be repeated as often as necessary. ultimately, you want to ensure that a step completes without any issues or errors.
For more details on making adjustments see Adjust Element Attribute Values.
- To close the Log, click on its x button.
Once the first four steps complete successfully, you can then publish the results.
When you Publish, it writes the results on the PI Tag for all Attributes defined as output attributes and that have the PI Point Data Reference configured with the "Read Only" flag set to "False".
To Publish, click on Publish.
Extended Case Analysis (Simplified Workflow)
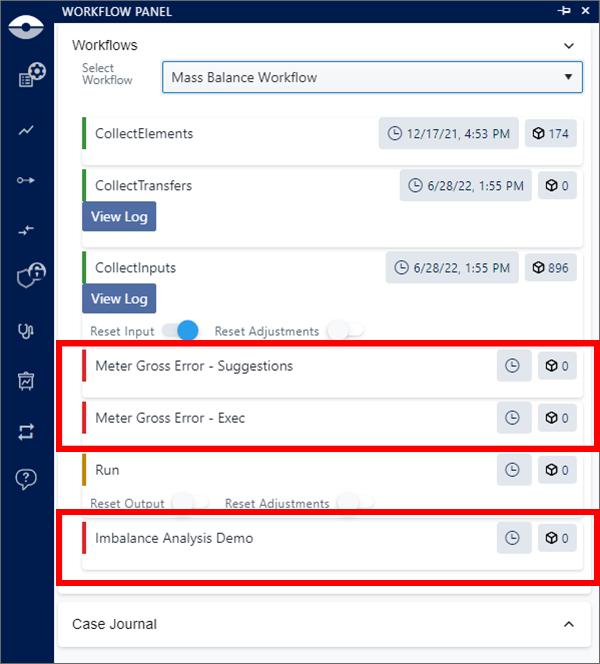
The integration of SigmafineHub Studio allows you to extend the standard (Default) case analysis, including additional ones implemented as Studio Analytic (See "SigmafineHub Studio Basic Guide" or "SigmafineHub Studio Guide" for more details).
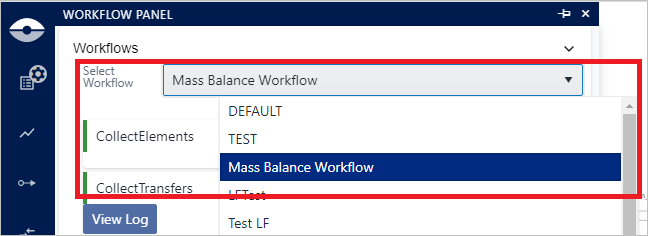
Configured extended analyses are listed in the "Select Workflow" drop-down menu.
To choose an extended case analysis:
Click the Select Workflow arrow to expand the Select Workflow list.
Expanded Workflow list
The Workflow sub-panel (Case Runner panel) shows all the configured analysis. The analyses are ordered by what has been defined during the configuration of the simplified workflow. the
Click on the extended case analysis name to activate it.
Extended Case Analysis