Create a Case
SFHub Visualizer provides a feature that allows you to create new cases for each available Sigmafine Analysis. Basically, when you add a new case, you are creating an instance of that case with the parameters (analysis, start and end time) needed to obtain the analysis results you need.
There are two ways you can create a case; using the "+" (plus sign) icon that precedes/follows an existing case block or by using the "Create a Case" button.
+ (Plus sign): When using the + icon, SFHub Visualizer automatically creates the start/end times and time range, and places the new case block in the appropriate chronological order in the Case Search list.
Create a Case button: When using the Create a Case button, SFHub Visualizer allows you to select the start/end times and time range, as well as the previous case to be associated with. SFHub Visualizer then places the new case block in the appropriate chronological order in the Case Search list.
Create a Case With the + (Plus) Sign
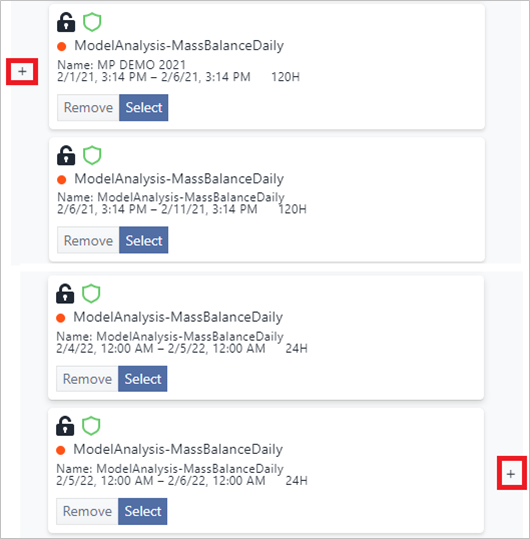
SFHub Visualizer provides an easy way to create a case using the plus sign that precedes or follows an existing case block (as shown in the following figure).
When using the + (plus sign) icon, SFHub Visualizer automatically creates the start/end times and time range, and places the new case block in the appropriate chronological order in the Case Search list.
Using the plus sign, you can have SFHub Visualizer automatically set the start/end times and time range for the case.
To create a Case using the plus sign:
Locate a case displaying the + (plus sign) to which the new case should precede or follow (according to the start/end times and time range).
A plus sign that precedes a case block indicates that you can add a new Case before that existing case. This creates a new case with an End Time equal to the Start Time of the existing case, and a time range equal to the time range of the existing case.
A plus sign that follows a case block indicates that you can add a new Case after that existing case. this creates a new case with a Start Time equal to the End Time of the existing case, and a time range equal to the time range of the existing case.
Create a Case using the "+" plus sign
Click on the + icon that will result in the appropriate start/end times and time range for the new case.
Preceding + (plus sign): When clicked, a new case is created with an End Time equal to the Start Time of the existing case, and a time range equal to the time range of the existing case.
Following + (plus sign): When clicked, a new case is created with Start Time equal to the End Time of the existing case, and a time range equal to the time range of the existing case.
Remember that SFHub Visualizer automatically places the new case block in the Case Search list either above or below the existing case block, depending on which plus sign you clicked on.
Create a Case With the Create a Case Button
When using the Create a Case button, SFHub Visualizer allows you to select the start/end times and time range, as well as the previous case to be associated with. SFHub Visualizer then places the new case block in the appropriate chronological order in the Case Search list.
To create a new Case using the Create a Case Button:
In SFHub Visualizer, click on the Case Search button to open the Cases panel.
Case Search panel - Add a Case
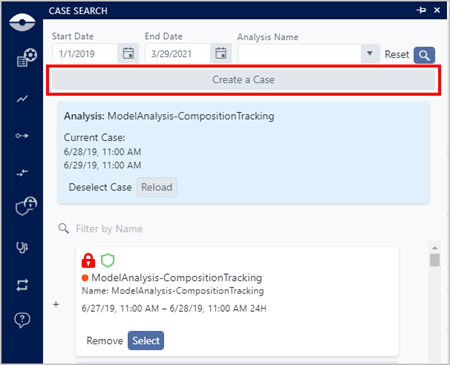
Click on the Create a Case button to open the Create a Case panel that lists the available analyses.
Create a Case panel
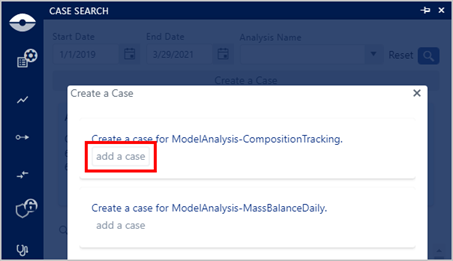
Click on the Add a Case button associated with the analysis for which you want to create a new case.
The Create a Case panel expands to display Name and Time Range boxes. While 'Name' is optional, you must enter a Start and End time.
Create a Case - Name and Date Time and Range selection

(Optional) Click in the Name box and type a name for the case.
Do one of the following to choose the Start Date date and time for the case:
Directly edit the date and time:
When entering the date and time in this manner, you do not need to enter the slashes between the month, day and year or the colon between the hours and minutes. Note that you can enter the date and time in any order, using the Tab key on your keyboard to move forward and the Shift + Tab keys to move back.
a. To change an entry, click on it to highlight it.
b. Type the new value in its place.
c. To move to the next entry, press Tab on your keyboard.
d. Repeat steps a - c for all entries you want to overwrite or enter.
Use the Date and Time Picker Calendar.
a. Click the
 Calendar icon to open the Date and Time Picker Calendar.
Date and Time Picker Calendar

:::info Note The date and time automatically defaults to the current date and your current, local time. :::
b. Select the date and time range as follows:
:::tip Click the blue TODAY option on the top right of the Date panel, if you want to choose the current date (month and day). :::
To select a different day from the current month and year:
i. Click on the day you want.
Date and Time Picker Calendar - current year and month

The app temporarily saves the day you chose and automatically switches to the Time tab where you are prompted to select the hour, minute and AM or PM.
:::tip Click the blue NOW option on the top right of the Time panel, if you want to choose the current time (hour, minute and AM or PM). :::
Time tab - choose hour, minutes and AM or PM

Time selections are based on a 12 hour clock with AM representing morning through midday hours and PM representing afternoon through evening hours.
ii. Use your mouse scroll button to cycle through the available time options.
Alternatively, you can use your keyboard up and down
arrows to cycle through the time options.
iii. Click on each time option you want to use.
iv. Click the Set button to save your choices and exit the calendar panel.
- To select a prior or future month:
i. Click on the month and year, as shown in the
following figure.
**<sup>Calendar - Left and right "month" arrows</sup>**<br />

The panel displays a list of months to choose from.
**<sup>Panel displays months</sup>**<br />

ii. Click on the month you want to choose.
The panel changes and prompts you to choose a day in
the month you chose.
iii. Click on the day.
Once you've chosen the day, the app temporarily
saves that information and automatically switches
to the *Time* tab where you are prompted to select
the hour, minute and AM or PM.
:::tip
Click the blue **NOW** option on the top right of
the *Time* panel, if you want to choose the current
time (hour, minute and AM or PM).
:::
**<sup>Time tab - choose hour, minutes and AM or PM</sup>**<br />

Time selections are based on a 12 hour clock with
AM representing morning through midday hours and
PM representing afternoon through evening hours.
iv. Use you mouse scroll button to cycle through the
available time options.
Alternatively, you can use your keyboard up and down
arrows to cycle through the time options.
v. Click on each time option you want to use.
vi. Click the **Set** button to save your choices and
exit the calendar panel.
- To select a prior or future year:
1. Click on the month and year, as shown in the
following figure.
**<sup>Calendar - Left and right "month" arrows</sup>**<br />

The panel displays the list of months to choose
from, with the year at the top.
**<sup>List of months with year at top</sup>**<br />

2. Click on the year, to display the list of years, as
shown in the following figure.
**<sup>List of years</sup>**<br />

If the year isn't shown in the list, click on the
\[year - year\] until it displays the year you want
in the list of available years.
**<sup>Click on Year - Year</sup>**<br />

3. Click on the year you want.
Once you have chosen the year, the app walks you
through selecting the month and day in the chosen
year.
Once the month and day choices have been made, the
app temporarily saves that information and
automatically switches to the *Time* tab where you
are prompted to select the hour, minute and AM or
PM.
:::tip
Click the blue **NOW** option on the top right of
the *Time* panel, if you want to choose the current
time (hour, minute and AM or PM).
:::
**<sup>Time tab - choose hour, minutes and AM or PM</sup>**<br />

Time selections are based on a 12 hour clock with
AM representing morning through midday hours and
PM representing afternoon through evening hours.
4. Use you mouse scroll button to cycle through the
available time options.
Alternatively, you can use your keyboard up and down
arrows to cycle through the time options.
5. Click on each time option you want to use.
6. Click the **Set** button to save your choices and
exit the calendar panel.
Repeat step 5 to choose the End Date date and time for the case.
(Optional) Repeat steps 5 & 6 to add a previous case Start Date and End Date.
Click the Create button to create the new Case.
Your new Case is added to the bottom of the list in the Cases panel.