Change Case Layers
When you work with Cases in a Display/Model that contains layers, the layer settings can vary from Case to Case, as some cases can include layers that others cases do not. Some cases may not have more than a single layer, in such instances, the Layers feature is not visible.
As with the Layers feature in the Model/Display, you can change the Layer setting in the context of a Case, if you wish to run an analysis using only those elements on selected layers.
See Sigmafine Model & Display Layers for further details.
When layers are changed (included or excluded) in your current display and Sigmafine Case, then SFHub trigger a new Collect Elements to update the element collection in the selected Sigmafine Case according to the selected layers. The Collect Elements automatically set the Case in checked-out and it will invalidate all the Case Runner steps (Collect Transfers, Collect Inputs and Run).
Layers cannot be changed when:
- The Sigmafine Case is checked-out by another user
- A Sigmafine Case has not been selected
To change the layer setting for a Case:
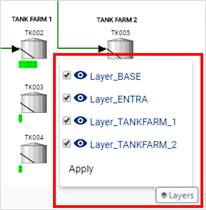
Click on the Layers option in the bottom bar.
The active/inactive layers for the selected Case context display in the Layers option panel.
Display with Layers option open
By default, all layers in the Case are shown in the display, and included in a Case analysis. Though once you select to hide a layer, it will remain hidden in the selected Case display, until someone selects to show that layer again.
NoteWhen you change the view of one or more layers in a Case display, it becomes the new default for everyone that views that display.
To hide the view of a Case layer:
a. Click on the layer check box to remove the check, as shown in the following figure.
Unchecked layer
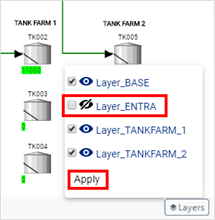
b. Repeat the step for each layer you want to hide from view.
c. Click Apply to see the results in the display.
The display refreshes. All elements in the deactivated layers are not included in the Case element collection, and are will not be included in any Case analysis execution.
Transfers that are connected to an element (Source or Destination) that is in an inactive layer appear, while transfers having a Source and Destination in an inactive layer do not appear and that transfer is not included in the analysis.
To show a hidden layer:
a. Click on the layer type's check box to insert a check, as shown in the following figure.
Re-checked layer
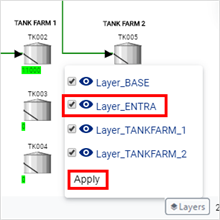
b. Repeat the step for each hidden layer you want shown in the view.
c. Click Apply to see the results in the display.
The display refreshes. All elements in the active layers are included in the Case element collection, and therefore, will be included in any Case analysis execution.
After a change is made to the Layer setting of a Case, it is mandatory that you re-execute all the Case Runner steps (Collect Transfer, Collect Inputs, Run).
Run the Workflow steps (see Run a Case Analysis for further details).
EXAMPLE: Excluding Tank Farms for a Case Analysis run
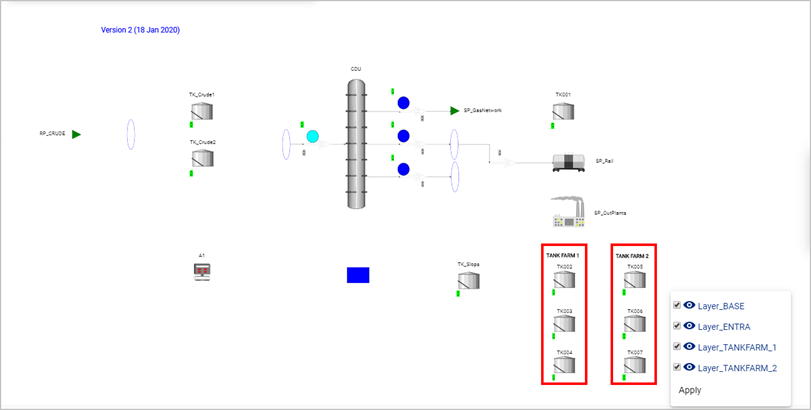
Click on the Layers option to display the active/inactive layers of the selected Case, as shown in the following figure.
The Case active/inactive layers
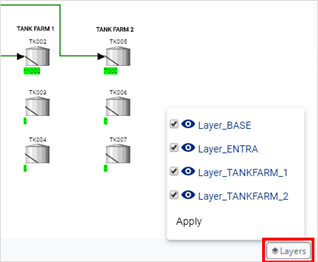
Notice how the all layers for the selected Case are appearing in the display (see the following figure).
Pay close attention to the Tank Farm elements as we progress through these steps.
All Case layers appear in the display
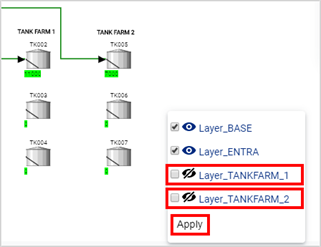
Uncheck the Layer_TANKFARM_1 and Layer_TANKFARM_2 check boxes, as shown in the following figure.
Select to hide Case layers
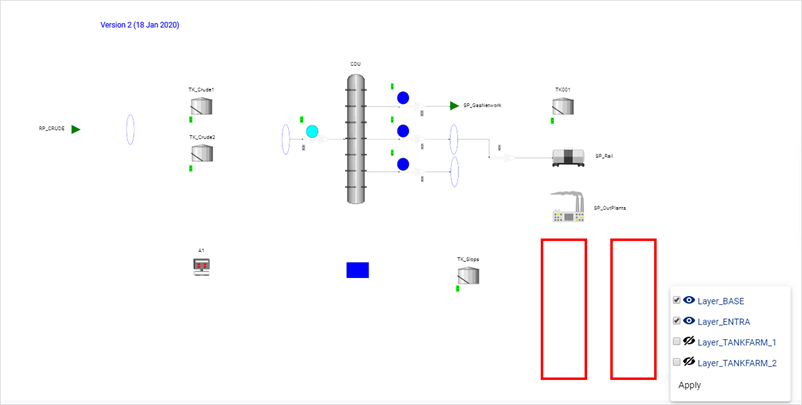
Click Apply.
Notice how the Tank Farms no longer appear on the display (see the following figure).
Tank Farms no longer appear in the display
Run the Workflow steps (see Run a Case Analysis for further details) to view the results of the analysis without the Tank Farms.