Debug Print
The following table provides information regarding the 'Debug Print' SFCodeBlock.
Debug Print SFCodeBlock
| Category | Debug |
|---|---|
| Description | Debug Print is used to log message in the Debug Output Window. This SFCode Block allows you to format a message using either static or dynamic parameters (see SFHub Composite Format String in SigmafineHub Expressions guide). If the analytic is not running in interactive mode, Debug Printi is [not] executed. |
| Input | None |
| Parameters | None |
| Pattern Support | Yes |
| Returns | None |
| Configuration | You are required to enter at least a format message. You can add as many prints as are required. To add a Debug Print pattern: 1. Click the Add button. Debug Print SFCodeBlock  2. Enter your configuration values in the Add DebugPrint configuration panel. 3. Repeat steps 1 & 2 for each required print pattern. Edit a Debug Print To edit a Debug Print pattern: 1. Click on the expression placeholder located in the shape. Action SFCodeBlock - Edit  2. Make the necessary changes in the Edit DebugPrint configuration panel. |
The format message can include a variable number of parameters enclosed between braces {}. Parameters are dynamic values managed by the analytic (e.g., Variables, Enumerators, Keywords).
Variables of complex data types (table, table row, dictionary and list) cannot be used in the format message parameters (Table, Dictionary and List enumerators). Table, Dictionary and List enumerators can be used to print the content of table columns or list/dictionary values.
For more details, see the SFHub Composite Format String
Debug Print Configuration Panel
The Debug Print configuration panel allows you to configure the format of the message to be printed out.
The following table describes the configuration options.
Debug Print Configuration
| Item | Required / Optional | Description |
|---|---|---|
| One instance of the message only | Optional | If enabled, only a single message is printed, regardless of the number of print patterns. This option is useful for debugging purposes. |
| Diagnostic code | Optional | A numeric diagnostic code can be associated with the message. The diagnostic code can be used by the analytic or the calling analytic, for filtering out the messages. |
| Format | Required | The text to be printed out. According to the SFHub Expression composite format string, the text can contain a fixed string as well as dynamic values. Variables of complex data types (table, table row, array, list and dictionary) should be used, referencing a specific column or index. |
Examples: Formatted strings and their print-outs
| Formatted String Example | Print-Out Example |
|---|---|
| myVar value = {$myVar} | myVar value = 5 |
| {Name} Measured Mass = {i_Meas_Mass} | TK_C4 Measured Mass = 1200 |
| Column1 value = {en[Column1]} | Column1 value = aaaaa The string 'aaaaa' is the value stored in Column1 of a table. In this example 'en' is the enumerator used by the For Each loop over the table rows. |
| List value = {en} | List value = 1 '1' is the value recorded in a List of values. In this example 'en' is the enumerator used by the For Each loop over the List of values. |
The following sections provide configuration examples for each supported placeholder.
Debug Print - Plugin name
Debug Print - Plugin name Supported placeholder
| Supported Placeholder | Description |
|---|---|
| {attribute.DR} | A placeholder ending with '.DR' is replaced with the data reference plug-in name configured for the attribute. |
Do not use quotes or single quotes.
Example: Use of 2 placeholders
In this example, we are using 2 placeholders:
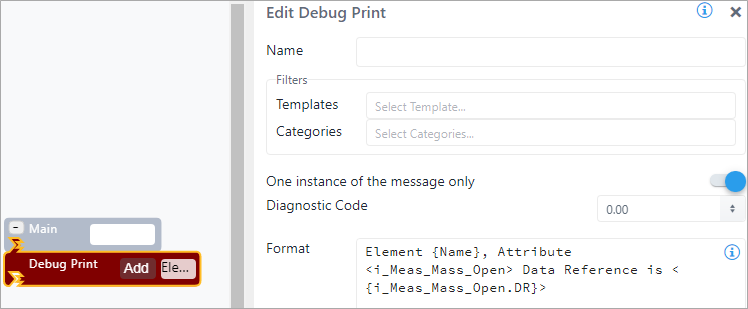
{Name} - Display the element name
{i_Meas_Mass_Open.DR} - Displays the plug-in name of the attribute I_Meas_Mass_Open
The result from the configuration is:

Debug Print - Unit of Measure
Debug Print - Unit of Measure Supported Placeholder
| Supported Placeholder | Description |
|---|---|
| {attribute.UOM} | A placeholder ending with '.UOM' is replaced with the Unit of Measure configured for the attribute. |
Do not use quotes or single quotes.
Example: Use of 3 placeholders
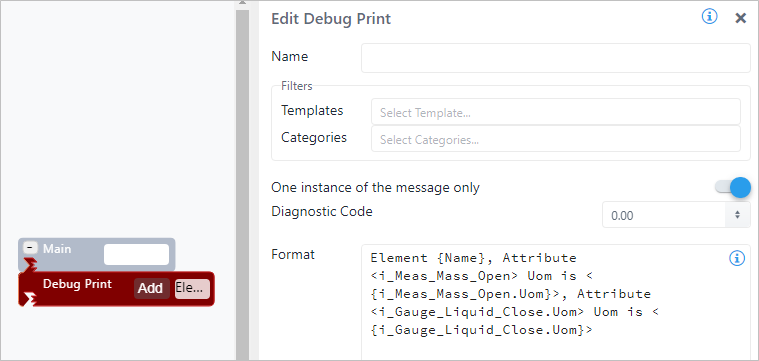
In this example, we are using 3 placeholders:
{Name} - Display the element name
{i_Meas_Mass_Open.UOM} - Displays the Uom of the attribute I_Meas_Mass_Open
{i_Gauge_Liquid_Close.UOM} - Displays the Uom of the attribute i_Gauge_Liquid_Close
The result from the configuration is:

Debug Print - Variables and Enumerators
Debug Print - Variable and Enumerator Supported Placeholders
| Supported Placeholder | Description |
|---|---|
| {$$VariableName} | A placeholder containing a string literal starting with \$\$ is replaced with the value of the Analytic variable. |
| {$VariableName} | A placeholder containing a string literal starting with \$ is replaced with the value of the Element variable. |
| {Enum} | If the code block is located inside a for or a for each loop, this placeholder can be used for printing the enumerator value. |
Example: Use of Variable and Enumerator placeholders
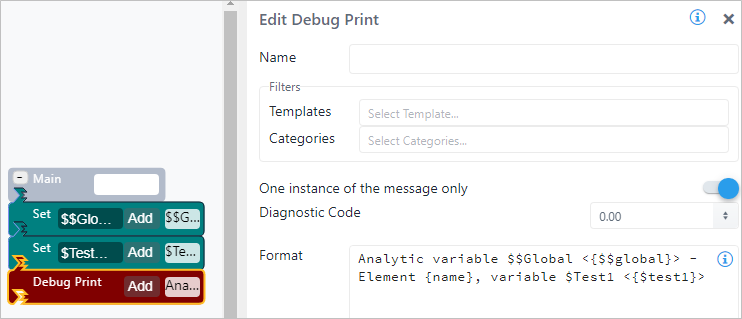
In this example, we are using 3 variable placeholders:
{Name} - Display the element name
{$$Global} - Displays the value of the analytic variable $$Global
{$Test1} - Displays the value of the element variable $Test1
The result from the configuration is:

Debug Print - Element Name and Template Name
Debug Print - Element Name and Template Name Supported Placeholders
| Supported Placeholder | Description |
|---|---|
| {Name} | The placeholder {Name} is replaced with the name of the element. |
| {Template} | The placeholder {Template} is replaced with the template name of the element. |
Example: Use of the Element Name and Template Name placeholders

In this example, we are using 2 variable placeholders:
{Name} - Displays the element name
{Template} - Displays the template name (if any)
The result from the configuration is:
Debug Print - Transfer
Debug Print - Transfer Supported Placeholders
| Supported Placeholder | Description |
|---|---|
| {TransferStart} | The placeholder {TransferStart} is replaced with the transfer start time if the element is a transfer. |
| {TransferEnd} | The placeholder {TransferEnd} is replaced with the transfer end time if the element is a transfer. |
Example: Use of the Transfer placeholders
![]()
In this example, we are using the Transfer placeholders:
{TransferStart} - Displays the start time of the transfer (if the element is a transfer)
{TransferEnd} - Displays the end time of the transfer (if the element is a transfer)
The result from the configuration is:

Debug Print - Case
Debug Print - Case Supported Placeholders
| Supported Placeholder | Description |
|---|---|
| {CaseStart} | The placeholder {CaseStart} is replaced with the Case start time. |
| {CaseEnd} | The placeholder {CaseEnd} is replaced with the Case end time. |
Example: Use of the Case placeholders
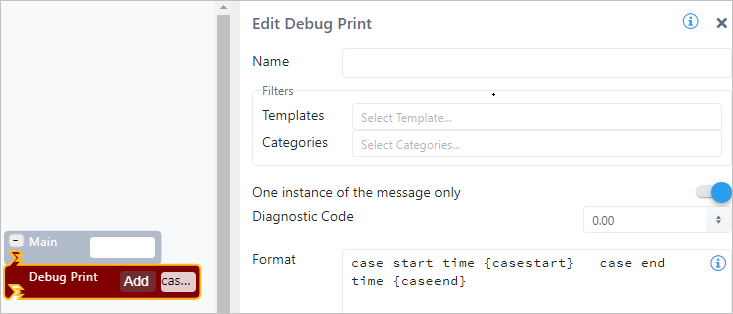
In this example, we are using the Case placeholders:
{CaseStart} - Displays the Case start time
{CaserEnd} - Displays the Case end time
The result from the configuration is:
![]()
Debug Print - Path
Debug Print - Path Supported Placeholders
| Supported Placeholder | Description |
|---|---|
| {InputPath} | The placeholder {InputPath} is replaced with the input path. |
| {OutputPath} | The placeholder {OutputPath} is replaced with the output path. |
| {AttachedPath} | The placeholder {AttachedPath} is replaced with the attached path. |
Example: Use of the Path placeholders
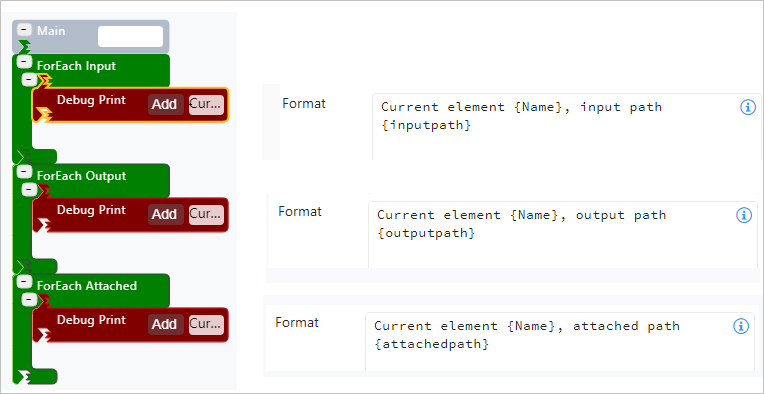
In this example, we are using the Path placeholders:
{InputPath} - Displays the input path (format: \name\name ...)
{OutputPath} - Displays the output path (format: \name\name ...)
{AttachedPath} - Displays the element name attached to the current element
The results from these configurations are:
Results from the Path Input placeholder configuration

Results from the Path Output placeholder configuration

Results from the Path Attached placeholder configuration

Debug Print - Connection
Debug Print - Connection Supported Placeholders
| Supported Placeholder | Description |
|---|---|
| {PreviousElement} | The placeholder {PreviousElement} is replaced with the name of the element connected in input. |
| {TopElement} | The placeholder {TopElement} is replaced with the name of the root element. |
Example: Use of the Connection placeholders
Example of the Connection placeholders
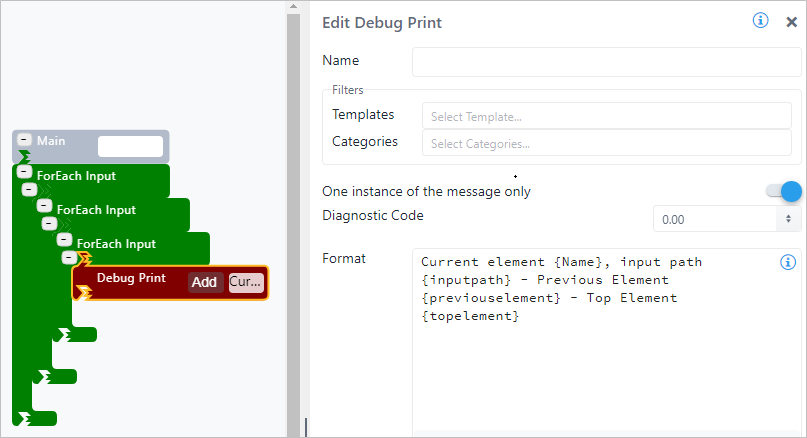
In this example, we are using the Case placeholders:
{InputPath} - Displays the path
{PreviousElement} - Displays the name of the element connected in input
{TopElement} - Displays the name of the root element, i.e. the element exploring the connections
The result from the configuration is:

Debug Print - On the Fly Expression
Debug Print - Connection Supported Placeholders
| Supported Placeholder | Description |
|---|---|
| { Expression } | Any valid SFHub expression enclosed in braces. |
Example of the On the Fly Expression placeholder
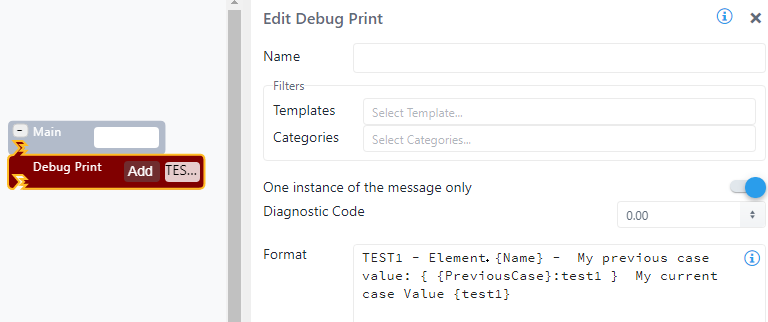
In this example, we are using the On the Fly Expression placeholder:
{Name} - Displays the element name
{ {PreviousCase}:test1 } - Displays the value of the attribute [Test1] in the previous case
{Test1} - Displays the value of the attribute [Test1] in the current case
Notice that the second placeholder is an expression using the Keyword [{PreviousCase}].
The result from the configuration is:

The Expression placeholder supports the full SFHubsyntax as listed in the "Sigmafine Hub Expressions Guide".
Although some placeholder names are equal, do not confuse placeholders with Keywords that can be used inside an expression placeholder. (See the Keyword section of "SigmafineHub Expressions Guide", for additional information.)