Specify the Transfer Name Mask
The Transfer Name Mask tab in the Transfer Entry System Settings window is used to create transfer names that are meaningful to the Operators.
To create a transfer name mask:
From the menu, select Tasks > Administrative Task > TES Settings.
The Transfer Entry System Settings window opens.
Click on the Transfer Name Mask tab to access the transfer name mask settings.
The 'Transfer Name Mask' tab is divided into two sections:
Transfer name mask
Build mask
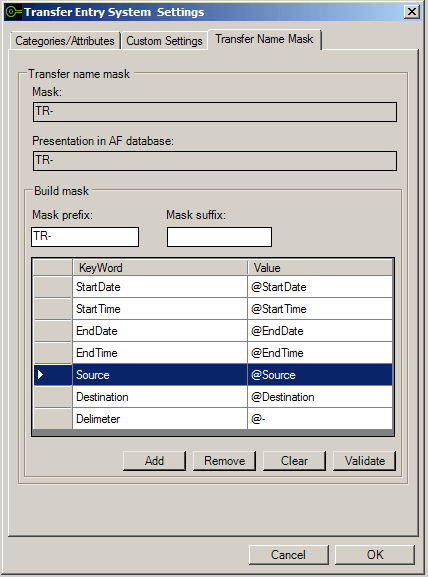
As you build the mask, the 'Transfer name mask' section displays the transfer name code string Mask and how it will appear in the AF database, while the 'Build mask' section allows you to actually build the transfer name mask.
Steps 3 through 9 are all performed in the 'Build mask' section.
In the Mask prefix box, type a characters to be used at the start of the transfer names.
Use a prefix that allows the Operators to easily identify the transfer type.
Notice how the Transfer name mask section is automatically updated with your entry.
Next, you start to actually build the mask using "Keywords." The Keywords are used to define value placeholders in the mask.
In the Build mask table select a Keyword, as shown in Figure 1730.
Ensure that you select the whole row, not just the Keyword name.
Click the Add button.
This action adds the keyword to your mask, as shown in the following figure.
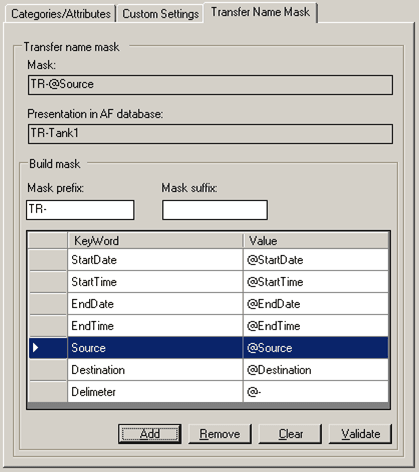
Notice how the 'Transfer name mask' section automatically updates the 'Mask' box with the keyword placeholder value and the in the 'Presentation in AF database' box with an example of how the actual data will be presented in the AF database.
Note: 'Tank1' is used only as an example; the actual source name depends on the selection made by the Operator.
Repeat steps 5 and 6 for each Keyword you need to add to the mask.
When you are finished adding your keywords, you are ready to add a suffix.
In the Mask suffix box, type the text or characters that should appear at the end of each transfer name.
The suffix is added to the end of the mask name in the 'Transfer name mask' section, as shown in the following figure.

 EXAMPLE: TR-@source@-@destionation@-pumphouse1
Using a transfer name mask of
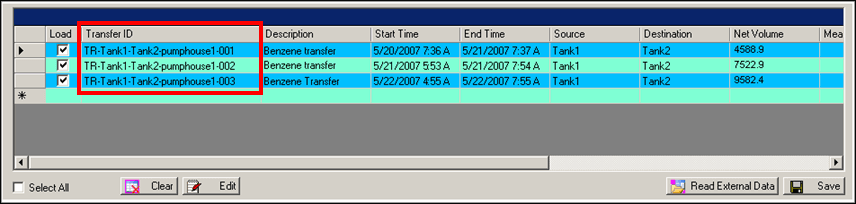
TR-@source@-@destionation@-pumphouse1, when an Operator creates transfers with the source 'Tank1' and the destination 'Tank2', the transfer names appear as:
TR-tank1-tank2-pumphouse1-001
TR-tank1-tank2-pumphouse1-002
TR-tank1-tank2-pumphouse1-003
Each transfer name is automatically created when the Operator inserts a transfer in the User Entry Form, as shown in the 'Transfer ID' column in the following figure.
(Optional) To remove any keyword from the mask:
Select the row of the Keyword you want to remove.
Click he Remove button.
(Optional) To remove all of your keyword selections, click the Clear button.
Click the Validate button to run a quick process that checks to see whether the database contains the type of data that matches the keywords you have selected.
If the database has data that corresponds to all the selected keywords, the process completes successfully and your settings are saved.
If the validation fails, you need to remove the offending keywords and rerun the validation. Once the validation completes successfully, your settings are saved.
Note: You can use the 'Validate' button at any time to validate a keyword selection; you do not have to wait until you have finished adding keywords. Regardless, it is good practice to still do a validity check after all keywords have been entered.