Add a Transfer
When you have the Transfer Result window open and active, SF-ADA provides you with a feature that allows you to create a new transfer.
To create a new transfer:
Right-click on any transfer in the Transfer Result window.
The application automatically recognizes the associated template and activates the proper menu; the AF security rules are applied.

Select Manage Transfer > Add Transfer from the menu that appears.
The AF Property window opens.
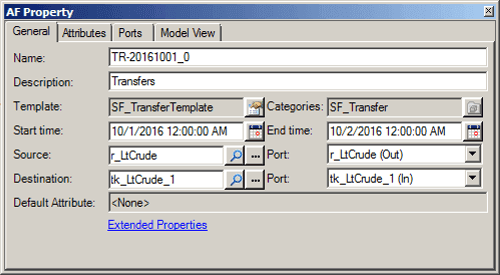
In the Name box, type a name for the new transfer.
(Optional) In the Description box, type a short explanation for the transfer.
In the Start time box, type (or select using the Calendar button) the time the transfer is to start.
In the End time box, type (or select using the Calendar button) the time the transfer should end.
In the Source box, type (or click the Search button to find and select) the source element.
In the Destination box, type (or click the Search button to find and select) the destination element.
Click on the Attributes tab.
Enter the additional values that are applicable to the transfer and elements you are creating (e.g. Mass/Density/Volume).