Use the ADA Toolbar
The Sigmafine Advanced Diagnostic Add-In (ADA) toolbar provides diagnostic operations for analyses and cases. These operations are described in the Sigmafine ADA Toolbar Options table. The ADA toolbar becomes visible only when ProcessBook is in the 'Run' mode and have a Case open. If you are in Build mode, the toolbar buttons are disabled (grayed out).
Displaying the ADA Toolbar
If the ADA toolbar is not displayed (loaded), perform the following steps to display it.
Select View > Toolbars from the main menu.
The Customize window opens.
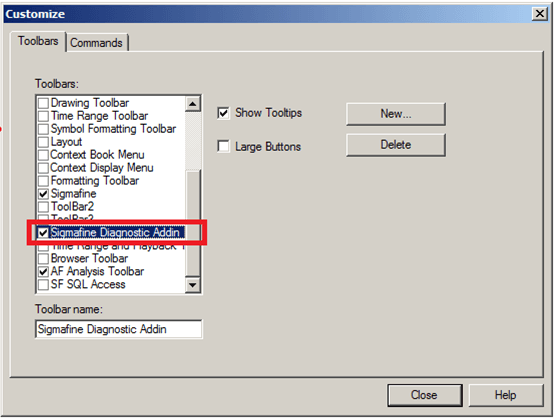
On the Toolbars tab, check the Sigmafine Diagnostic Addin checkbox.
A check indicates that the options displays on the toolbar.
Click Close to save your selection and close the Customize window.
The Sigmafine Diagnostic Addin toolbar displays.

Sigmafine (ADA) Diagnostic Addin Toolbar Options
The following table provides the function for each option on the Sigmafine Diagnostic Addin Toolbar.
Sigmafine ADA Toolbar Options
| Button | Option | Function |
|---|---|---|
| Fit Model | The Fit Model button resizes the display so that you can see the entire Model in the display (this is the same as the ProcessBook “Fit all” function). | |
| Zoom Selected Item | The Zoom Selected Item button resizes the display to show the selected elements (usually a section of the model).To use:Click at a corner of the area you want to zoom in on and hold down the left mouse button.Drag your mouse to select the desired area you want to enlarge.Release the mouse button and then click the Zoom Selected Item button.All elements in the selected area are enlarged. | |
| Case Data Replication | The Case Data Replication button allows you to copy Attribute data from the previous case (that is linked as per the Case Properties window) to the current case. For further details see Use Case Data Replication. | |
| Sigmafine Result | The Sigmafine Result button displays the 'Sigmafine Result' dockable window. For further details see Open the Sigmafine Results Table. | |
| Edit Element | The Edit Element button allows you to view only those Attributes that might potentially require adjustments. For further details see Edit an Element. | |
| Get Object Info | The Get Object Info button displays the Case balance data for any Element in the Sigmafine Model and enables users to check and analyze the results of the reconciliation. For further details see Access Object Information. | |
| Sigmafine Ad Hoc Trend | The Sigmafine Ad Hoc Trend button allows you to display a trend with some specific data from the element (Data Referenced with PI Point). For further details see Ad Hoc Trending. | |
| Apply Sigmafine Color to Symbols | The Apply Sigmafine Color to Symbols button allows you to color each Element on the ProcessBook display according to the color of one of its attributes. For further details see Apply Result Color to Symbols. | |
| Configure Symbol Color Settings | The Configure Symbol Color Settings button allows you to open a window in which you can view/change the colors that have been configured for Attributes on the ProcessBook display. For further details see Configuring Result Colors. | |
| Configure Result Table | The Configure Result Table button opens the Configure Results Table window in which you can view/change the configuration settings. For further information see View the Results Table. For more configuration details see AF Table: SFDiag_TableConfig. | |
| Show Transfer Log Table | The Show Transfer Log Table button opens the Transfer Log Table in the ProcessBook window. For more details about transfers see Managing Transfers. | |
| Execute Command | The Execute Command button allows you to launch a program. More details about this function can be found in the AF Table: SFDiag_Params \topic. | |
| Help | The Help button opens the online help portal. | |
| About | The About button open a window that displays the application's product information. |