Get a List of Adjustments
The Adjustments option retrieves the names, creation times, previous values, & adjusted values for every adjustment in the Case based on the selected Server, Database, Model, Analysis, and Case Start/End Time.
To get a list of Case times to use:
In Excel, select the cell into which you want the information to be brought.
From the SF tab Find Data section, select Adjustments.

The Get Adjustments window opens.
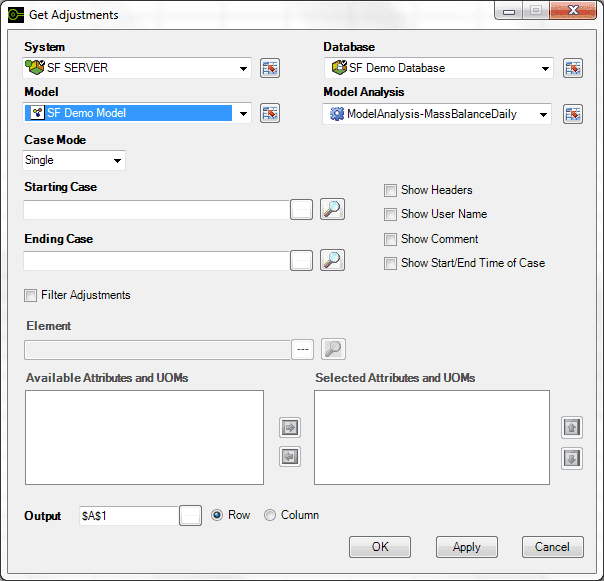
Click the System down-arrow and select the system where the Sigmafine Server is running.
Click the Database down-arrow and select the database.
This selection is dependent on the Sigmafine Server selection.
Click the Model down-arrow and select the model.
This selection is dependent on the Database selection.
Click the Model Analysis down-arrow and select the Model analysis.
This selection is dependent on the Model selection.
Note: For System, Database, Model and Model Analysis, you can click the
 Cell Reference button to select from a list of cells referencing the selected item.
Click the Case Mode down-arrow and select the option you want to use.
- Single Case: One Case will be pulled from the AF Database.
- Multiple Cases: All Cases between the starting Case and ending Case will be pulled from the AF Database.
In the Starting Case box, type the Case you want to use for the beginning of the search period.
Alternatively you can click the
 Search button to search for and select the Case from the Case Search window. See Get List of Case Times to Use for more details.
In the Ending Case box, type the Case you want to use for the ending of the search period.
Alternatively you can click the
Search button to search for and select the Case from the Case Search window. See Get List of Case Times to Use for more details.Check all checkboxes that are applicable to your search.
- Show Headers: When checked, column headers are displayed in the spreadsheet.
- Show User Name: When checked, the name of the user that performed the adjustment is displayed in the spreadsheet.
- Show Comment: When checked, the adjustment comment is displayed in the spreadsheet.
- Show Start/End Time of Case: When checked, the Case start times and end times are displayed in the spreadsheet.
- Filter Adjustments: When checked, all the adjustments of a specific Element or all adjustments of only selected Attributes of that Element are retrieved.
Click the Element
 ellipsis button and select the name of the element.
Alternatively you can use one of the following:
- Position the cursor in the Element field in the window and then click the cell in the spreadsheet containing the names of the elements.
- Click the Search button to open the Element Search window in which you can search for and select the element. See Get Names of Elements for more details.
Using the Available Attributes and UOMsand Selected Attributes and UOMs list boxes, select each Attribute that you want to appear in the spreadsheet. Ensure that only those Attributes that you want to appear are in the 'Selected Attributes and UOMs' list.
Attributes will appear in the spreadsheet in the order in which they appear in the Selected Attributes and UOMs list box.
 To move an Attribute to the 'Selected Attributes and UOMs' list
In the Available Attributes and UOMs list box, select the attribute.
Click the right-arrow to move it to the Selected Attributes and UOMs list.
To remove an Attribute from the 'Selected Attributes and UOMs' listIn the Selected Attributes and UOMs list box, select the attribute.
Click the left-arrow to move it to the Available Attributes and UOMs list.
Attributes appear in the spreadsheet in the order in which they appear in the 'Selected Attributes and UOMs' list box. If you want to rearrange the order, use the following applicable steps.
To move an Attribute up one place in the Selected Attributes and UOMs listIn the Selected Attributes and UOMs list box, select the attribute.
Click the up-arrow.
To move an Attribute down one place in the Selected Attributes and UOMs listIn the Selected Attributes and UOMs list box, select the attribute.
Click the down-arrow.
In the Output box, type the reference of the cell in which the information is to start appearing in the spreadsheet, or click the
ellipsis button to select the cell from another window.Select whether to add the information to the spreadsheet in rows (Row) or columns (Column).
Click OK to add the returned information to the spreadsheet and close the window.
Click the Apply button if you want add the returned information to the spreadsheet but keep the window open.
Click the Cancel button if you want to close the window without adding the returned information to the spreadsheet.