Send a Message
To create and send a message using the SFHub Visualizer Messaging feature:
Click on the Messaging icon, to open the Messaging panel.
The messaging panel shows the channel list, based on whether you are working with a display or report.
Messaging panel - when working with a display Messaging panel - when working with a report 

Click the
 message icon to the right of the group or person to whom you
want to send a message.
message icon to the right of the group or person to whom you
want to send a message.Click the Display or Report message icon if you want to communicate with all users who are using the same Display or Report.
Click the Case message icon if you want to communicate with all users who are using the same Case.
Click the Display and Case or Report and Case icon if you want to communicate with all users who are using the same Display or Report and the same Case.
Click the [user name] message icon of the specific user with whom you want to communicate (send/receive messages). Only the initials and names of those users who are currently connected to SFHub Visualizer appear in the list.
:::info Note If the initials and name of the user you want to send to are not in the list, it could be that they are not currently using SFHub Visualizer, or they may have just signed into the app and the list of users has not yet refreshed to reflect that they are connected. If you would like to refresh the list now, click on Refresh Users. :::
Another panel opens in which you can type your message, as shown in the following figure.
Message box panel
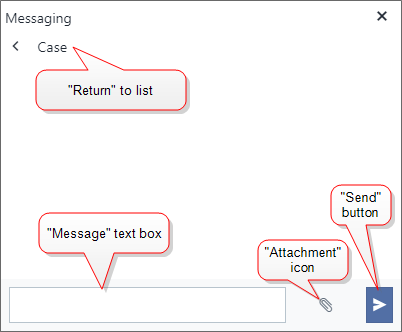
In the Message text box at the bottom of the panel, type the message you want to send.
To add an attachment to your message, do one of the following:
- Click the
 Attachment icon to open a standard Windows File Explorer
window in which you can select the file.
Attachment icon to open a standard Windows File Explorer
window in which you can select the file. - Open Windows Explorer, locate the file you want to attach and then drag and drop the file onto the Message text box. Do not drop the file in the Chat area, as it will result in the file not being attached and sent.
The attachment name appears next to the Choose File button.
- Click the
Click the
 Send button to send the
message.
Send button to send the
message.The message you sent appears in the Chat area of the Messaging panel. If you sent an attachment, it appears in the Chat area as well. As people answer your message, their answers also appear in the Chat area of the panel.
To respond to a received message, repeat steps 3 and 5.
To respond to a received message and add an attachment, repeat steps 3 through 5.
NoteIf you wish to save text from a Chat with another user, you will have to take screen shots of the Chat area prior to logging out of SFHub Visualizer. Once you log out, the Chat area is cleared so messages and attachments are no longer visible.