Create Transfers: User Entry Form
Typically, the primary task of an Operator is to create one or more new transfers. This can be done either through the User Entry Form or the Pumper's Log. The following instructions are for the User Entry Form. Steps for using the Pumper's Log can be found under Create Transfers: Pumper Log Form.
To create a transfer using the User Entry Form:
Run the TES application and log in.
Click on the Windows Start icon to display the list of installed applications.
Select Sigmafine > Sigmafine Transfer Entry System to open the Sigmafine Transfer Entry System.
From the menu select Task > Operator Tasks > Create Transfers.
The Transfer Entry System - User Entry Form window opens.
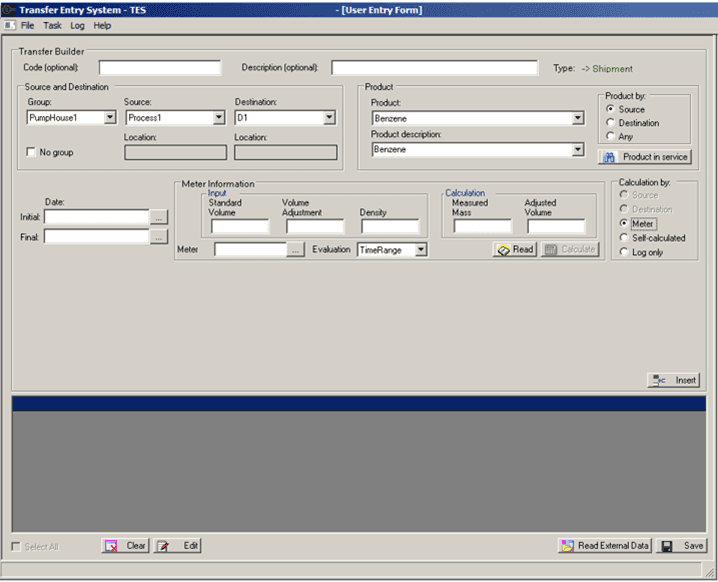
The options available in the User Entry Form depend on how its presentation was configured by the TES Administrator as well as by the selections you make. Therefore, Figure 1777 is for example use only. If a step below involves an option that you do not see in the form, you can skip that step.
Use the two optional boxes at the top of the form to enter a code and description for the transfer name.
These two settings are labeled as optional, because transfer names can be created automatically, depending on the configuration your TES Administrator has specified.
In the Code box, type the code that represents the transfer name.
In the Description box, type an actual description for transfer code/name.
To the right of the 'Description' box, is a "Type" value that indicates the "type" of transfer (receipt, shipment or movement). This value cannot be changed.
Use the 'Source and Destination' section of the form to define the source and destination information for the transfer you are creating.

The selections you make in this section are used to restrict the transfer to a specific group if needed, and to define the beginning point and ending point of the transfer.
If you need to restrict the transfer to a specific group, click the Group down-arrow and select the group name.
If not, check the No Group checkbox.
Click the Source down-arrow and select the beginning point of the transfer.
The 'Location' box directly underneath automatically populates with the select AF element's attribute. Note that 'Location' cannot be edited.
Click the Destination down-arrow and select the ending point of the transfer.
The 'Location' box directly underneath automatically populates with the select AF element's attribute. Note that 'Location' cannot be edited.
Use the 'Product' section of the form to select the product by name or description.

In the Product section under Product or Product description, click the down-arrow to select the product for the transfer.
In the Product by area, click on Source, Destination or Any, depending on your company's product movement rules.
Some companies do product movements according to the products allowed by the source; others use the product from the destinations. At other times they do not follow any particular rule and they want to select any product available. For these reasons, you have the option to select how the product movements are allowed.
(Optional) Click the Product in service button to select which items are considered for an element.
A Selected Items window opens that allows you to place items in service for the transfer.
 EXAMPLE: Product in service - Based on the Element, SF_GaugedTank1
Based on the Element displayed in Figure 1780, Tank 1 has CrudeA and CrudeB as material in service. CrudeC is not in service for the tank, and therefore, does not show up in the source and destination selection for the tank. However, if you select Product in Service, you can place CrudeC in service for the tank through using the Selected Items window.

To place an item in service for your transfer:
Check the item's checkbox.
Repeat for each item you want to select.
When you are finished, click OK to save your selections.
Use the 'Date' section to set the initial and final dates.

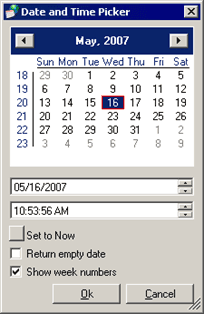
In the Initial box, type the initial date in
mm/dd/yyyyformat, or click the ellipsis button to select if from a Calendar.
In the Final box, type the final date in
mm/dd/yyyyformat, or click the ellipsis button to select it from a Calendar.Use the 'Calculation by' section to determine how the source and destination input data is calculated.

The following list describes each available selection.
Source: Calculate the transfer quantity based on the change in tank level of the source tank.
Destination: Calculate the transfer quantity based on the change in tank level of the destination tank.
Meter: Calculate the transfer quantity based on a meter measurement. You select a meter to find the information of the transfer.
Self-calculated: The reconciliation process calculates the transfer. It is entered as an unknown quantity.
Log only: The transfer is of interest for logging only and does not participate in the balance. This happens when it is not possible to estimate a transfer and therefore, it is not necessary to estimate it by the reconciliation process.
To select a Calculation by option:
Click on the Calculation by method you want used by the transfer you are creating.
Depending on your selection, different data input fields display. Please refer to Input Data Options for more detailed steps based on each available Calculation by option.
After all the information for the transfer has been entered, click the Insert button.
The bottom section of the User Entry Form window displays the transfer data, as show in the following figure.
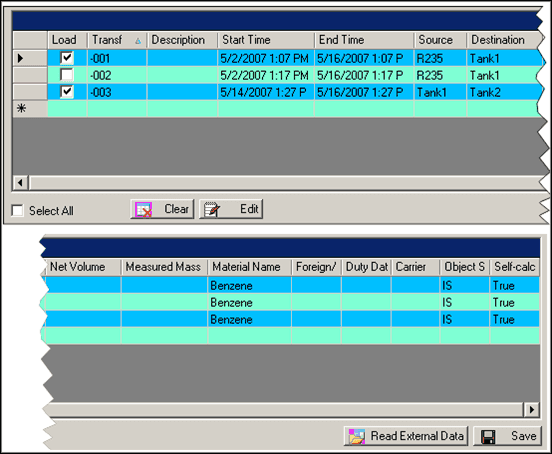
The columns of data that appear are determined by how the form was configured by the TES Administrator.
Based on what you need to do, follow the appropriate step listed below.
Click the Edit button to move the transfer data back into the entry boxes of the User Entry Form for revision, if necessary.
Note: Not all the transfer data is available for revision. The input section must be recalculated or re-entered.
Click the Clear button to remove the transfer data that has been inserted, and to clear all entry boxes of the User Entry Form.
Click the Read External Data button to import data into the User Entry Form from an Excel file.
- Click Save to check-in all transfer data to the AF Database.
Input Data Options
The following provides the additional steps required by each selection available in the 'Calculate by' section of the User Entry Form.
If you selected:
The Source/Destination Input area displays.
Click the Read button so that TES can execute an AF data reference to obtain values.
After the read, you can change a value or enter it manually, if necessary.
If you have made any value changes, click the Calculate button (or press Enter) to re-evaluate the values.
When you re-evaluate the values, the results appear in the Calculation area, as shown in the following figure.

The Meter Information area displays.
Click the Meter
ellipsis button (at the bottom left) to select the meter to use.Click the Read button so that TES can retrieve transfer information from a meter.
After the read operation, you can change a value or enter it manually, if necessary.
If you have made any value changes, click the Calculate button (or press Enter) to re-evaluate the values.
The Date information area displays.
The Date information is all that is necessary when you select either the Self-Calculated or Log Only option.
Use the 'Date' section to set the initial and finals dates.
- In the Initial box, type the initial date in
mm/dd/yyyyformat, or click the ellipsis button to select if from a Calendar. - In the Final box, type the final date in
mm/dd/yyyyformat, or click the ellipsis button to select it from a Calendar.