Configuring and Using the Data Importer
Below are the general steps for configuring and running the Data Importer. Note that different configuration options, as well as import file columns may be required based on the type of data you are importing.
For the purpose of providing useful information, the following general steps show how to use the Data Importer to import data for Elements and Transfers into Sigmafine. Specific steps for each type of data import can be found under the data type imports listed here.
- Importing Attribute Values (Elements)
- Importing Component Data Tables (Elements)
- Importing Attribute Values Data Table (Elements)
- Importing Transfers (Transactions)
- Importing Strapping Tables
Configuring and Running the Data Importer
Note: Please note that the following steps are generalized. You will need to refer to the actual \topicthat coincides with the type of data you need to import.
To configure and run the Data Importer:
Double-click on the Data Importer file (
Pimsoft.DataImport.exe).The Data Importer main window opens.
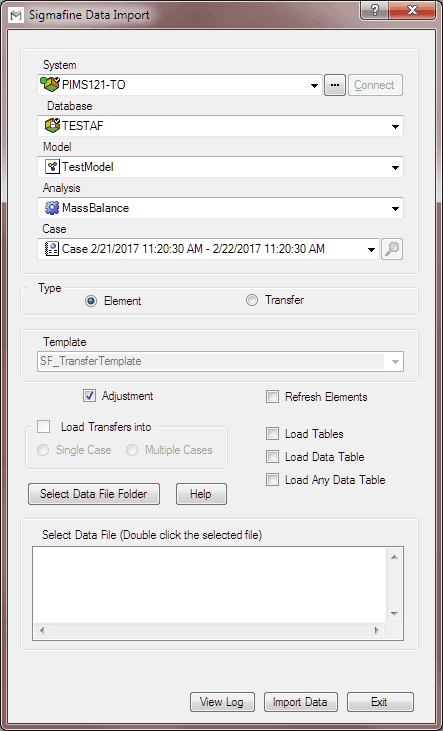
The Data Importer allows you to locate and select where you want to import values. It starts in the most general selection with the 'system' and may end up in the most specific, the 'Case'.
Click on the System down-arrow and select the AF Server or System.
If the server or system you are seeking does not appear in the drop-down menu, use the
 ellipsis button to locate and select the correct server or system.
Click the Database down-arrow and select the database that exists on the AF Server.
Only the databases available on the selected server or system will be available in the list of database selections. These Databases may belong to different Plants, Refineries, Mines, etc.
Note: The Databases cannot be modified within Data Importer, nor can new databases be created. The Databases available in the list are the ones currently residing in System Explorer. To make any modifications to a database, you will need to use System Explorer.
Click on the Model down-arrow and select a model.
Note that only those Models that exist in the selected database are available. Like databases, Models cannot be modified or created in Data Importer. To modify or create a model, use System Explorer.
Click on the Analysis down-arrow and select the Analysis Rule for the selected model.
For example, it can be Sigmafine Mass Balance, Component Balance, Composition Tracking, etc.
Note that only those analyses that exist for the selected Model are available. Like databases and models, an analysis cannot be modified or created in Data Importer. To modify or create a model, use System Explorer.
Click on the Case down-arrow and select the Case to which the data will be imported.
If the Case you are seeking does not appear in the drop-down menu, use the
 Search button to locate and select the Case into which you want to import the data. Clicking the Search button opens the Case Search window. See Using Case Search for more details.
Under Type, select the appropriate Element type for the Case you have selected.
- Element - Elements are the different pieces that compose a Sigmafine Model. These Elements represent Processes, Inventories, Receipt and Shipment Points and Flows. Elements can be found in System Explorer under Library > [Database Name] > Elements.
- Transfer - Transfers (known in some industries as transactions), can be a movement from a supplier to the facility, from the facility to a customer, or transfers within the facility. Transfers over financial or political boundaries (co-owned facilities) can also be identified and tracked. Transfers can be found in System Explorer under Library > [Database Name] > Elements > [Model Name].
(Optional) Click on the Template down-arrow and select the template to use.
This option is only available when you select 'Transfer' as the Type. If you want to add (or create) new transfers, you need to specify the 'Template' in which those transfers will be added. In some situations, several Transfer templates exist within a database. Templates cannot be modified or created in Data Importer. Transfer templates can be found and created in System Explorer under Library > [Database Name] > Templates > Transfer Templates.
Using the following table, check the appropriate checkboxes.
Unless otherwise indicated, checkboxes/options listed in the table are optional.
Data Importer Options
Checkbox / Option Description Adjustment Checked: Values are imported into the Case as adjustments. These adjustments show up in Attributes with an adjustment sign that indicates an adjustment has been made.Unchecked: Values are imported as 'Inputs'. It is not recommended to check this option, because these changes would be lost if after importing the values, ‘Collect Inputs’ is done with Reset Results as on.See Configuration Guidelines for additional details about this checkbox. Refresh Elements Checked: Other Attributes of the Elements might depend on the Attribute value being imported to update the calculation. Checking this Refresh option will reset all the Attributes of the corresponding Element so that the calculations are updated even if they are configured as Case Input category. Ex: If Mass is being calculated using Density and Volume, and new value of Density is imported; this option being checked will refresh the Mass Attribute such that it calculates using the new Density. It is recommended to use this option.Unchecked: Other Attributes of the corresponding Elements are not reset if they are Case Inputs. Even if this option is not checked, a user can prefer to manually ‘Collect Inputs’ for a Case in order to reset all inputs of all Elements.See Configuration Guidelines for additional details about this checkbox. Load Transfers into Only available and required when 'Transfer' is selected for 'Type'.Single Case: Transfers get created and then automatically get pushed into the case.Multiple Cases: Transfers get created and then automatically get pushed into their respective cases. Load Table Select only one of the checkboxes, based on the type of table you are loading. Ensure that the tables you are loading are in the correct folder and that they have the right format and configuration.Load Table: Used to Load Strapping Tables. Load Data Table: Used to Load Component Data Tables.Load Any Data Table: Used to load Composition Tracking Results and any other table.Note: Both the 'Load Tables' and 'Load Data Table' options do not support multiple cases.Note: Ensure that all three of these checkboxes are cleared when working with Elements or Transfers.See Configuration Guidelines for additional details about this checkbox. Click on the Select Data File Folder button to choose the folder where the Excel file is located.
A Browse For Folder window opens.

Locate and select the Excel file.
Click OK to save your selection and close the Browser For Folder window.
You are returned to the main Data Importer window.
Double-click on the Excel file to open it and ensure that the correct worksheet is active and the columns and data are in the correct format and layout. For more information see Required Standard Import File Formats.
It is necessary to make sure that the right Worksheet is active.
The Worksheet must have at least two columns in that order: The 'Select(x)' and the 'Name' columns in that order. The other column headers must be the names of Attributes that exist for those Elements.

Please refer to the appropriate \File Format topic associated with the type of data you are importing, for details regarding additional file formatting requirements.
Standard Required Spreadsheet Columns
Column Description Select(x) If the row contains an "x". the row of information will be imported to Sigmafine. Name Refers to the given name for the Element. Attribute Refers to the name of the Attribute to be imported to Sigmafine. Note: While working with Excel Files, it is common to have several Workbooks open at the same time. We recommended that you close all Excel Files and keep them closed, while working with Data Importer. Double-clicking on another Excel file while running the Data Importer will cause a message to appear stating that you need to close the workbook that is being used for the import.
(Optional) To view the log from the most recent import, click the View Log button.
Click the Import Data button to begin the import.
When the import finishes, a confirmation window opens.

Click OK to close the confirmation window.
Click on the View Log button to open the log file in Notepad.

Any attribute, that does not already exist in the Case into which you are importing, will be ignored (i.e., it will not be added). This holds true for any Attribute with a name that differs from an existing Attribute in the case.
 EXAMPLE: Attribute that does not exist in selected case
Using the same information as shown in the Figure 948 log file; if we try to import the following information:

The log will display as this:
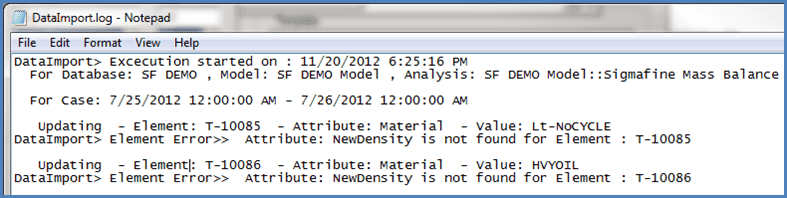
In this log, Data Importer successfully updated the Attribute called Material for both Elements. However, values for attribute NewDensity were not updated as that Attribute does not exist. The Attribute that does exists is Density which also was not updated because it was not listed in the import file.