Importing Attribute Values (Elements)
The following steps provide an example of an import that updates an Attribute called 'MeasuredMass' with certain Values for the corresponding Elements.
For Analyzers, the Attribute is not for Component Data Table. For this type of situations (Component Data Table), a small change needs to be done to the Excel File, as explained in Import File Format for Elements.
To import update values for an attribute:
Double-click on the Data Importer file (
Pimsoft.DataImport.exe).The Data Importer main window opens.
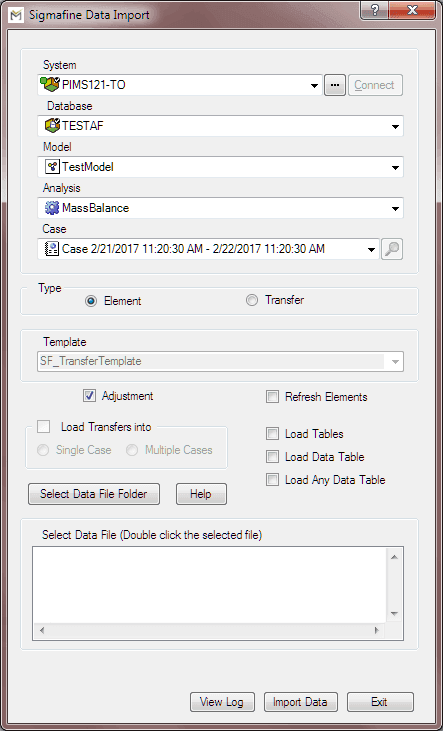
Click on the System down-arrow and select the AF Server or System.
If the server or system you are seeking does not appear in the drop-down menu, use the
 ellipsis button to locate and select the correct server or system.
Click the Database down-arrow and select the database that exists on the AF Server.
Only the databases available on the selected server or system will be available in the list of database selections.
Note: The Databases cannot be modified within Data Importer, nor can new databases be created.
Click on the Model down-arrow and select a model.
Only those Models that exist in the selected database are available.
Click on the Analysis down-arrow and select the Analysis Rule for the selected model.
Only those analyses that exist for the selected Model are available. For our example, we have selected Sigmafine Mass Balance.
Click on the Case down-arrow and select the Case to which the data will be imported.
If the Case you are seeking does not appear in the drop-down menu, use the
 Search button to locate and select the Case into which you want to import the data. Clicking the Search button opens the Case Search window. See Using Case Search for more details.
Under Type, select Element (as shown in the following figure).

Select Adjustment and/or Refresh Elements checkboxes are if they apply (as shown in the following figure).

Check the Load Any Data Table checkbox for your load table option (as shown in the above figure).
Click on the Select Data File Folder button to choose the folder where the Excel file (or .csv file) is located.
A Browse For Folder window opens.

Locate and select the Excel (or .csv) file.
Click OK to save your selection and close the Browser For Folder window.
You are returned to the main Data Importer window.
Double-click on the Excel or .csv file to open it and ensure that:
For Excel; the correct worksheet is active
For both Excel and a .csv file; the columns are in the correct format.
The specified format can be found under Import File Format for Elements.
For more information regarding additional file formats, see Editable Comments for Attribute Values, Multi-Case File Format for Elements, and Custom Unit of Measure for Attribute Values.
Note: While working with Excel Files, it is common to have several Workbooks open at the same time. We recommended that you close all Excel Files and keep them closed, while working with Data Importer. Double-clicking on another Excel file while running the Data Importer will cause a message to appear stating that you need to close the workbook that is being used for the import.
(Optional) To view the log from the most recent import, click the View Log button.
Click the Import Data button to begin the import.
When the import finishes, a confirmation window opens.

Click OK to close the confirmation window.
Click on the View Log button to open the log file in Notepad.
Any attribute, that does not already exist in the Case into which you are importing, will be ignored (it will not be added). This holds true for any Attribute with a name that differs from an existing Attribute in the case. See the example under step 17 in Configuring and Using the Data Importer, under General Information.
Close the log file when you are done viewing it.