Importing Transfers (Transactions)
The procedure to following for Importing Transfers is similar to that of Importing Elements. Though, instead of elements, you are importing the data regarding movement from a source to a destination.
To import transfers (also referred to as "transactions"):
Double-click on the Data Importer file (
Pimsoft.DataImport.exe).The Data Importer main window opens.
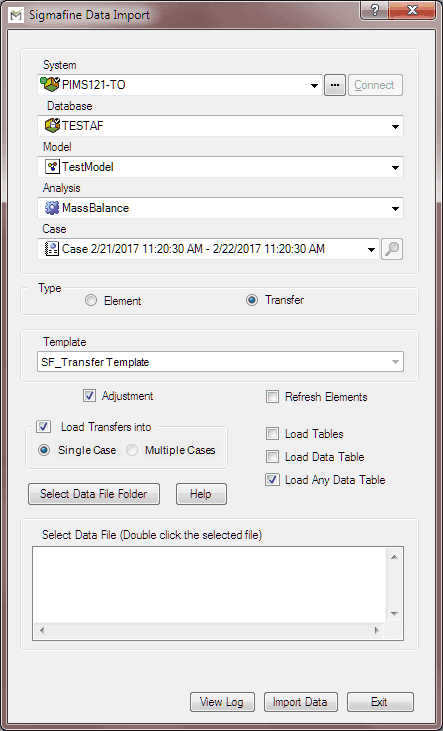
Click on the System down-arrow and select the AF Server or System.
If the server or system you are seeking does not appear in the drop-down menu, use the
 ellipsis button to locate and select the correct server or system.
Click the Database down-arrow and select the database that exists on the AF Server.
Only the databases available on the selected server or system will be available in the list of database selections.
Note: The Databases cannot be modified within Data Importer, nor can new databases be created.
Click on the Model down-arrow and select a model.
Only those Models that exist in the selected database are available.
Click on the Analysis down-arrow and select the Analysis Rule for the selected model.
Only those analyses that exist for the selected Model are available. For our example, we have selected Sigmafine Mass Balance.
(Optional) Click on the Case down-arrow and select the Case for which the data will be imported. If importing transfer data for more than one case, do not select any cases.
If the Case you are seeking does not appear in the drop-down menu, use the
 Search button to locate and select the Case into which you want to import the data. Clicking the Search button opens the Case Search window. See Using Case Search for more details.
Under Type, select Transfer (as shown in the following figure).

When 'Transfer' is selected as the Type, the 'Template' section becomes available.
Click the Template down-arrow and select the template to use for your transfer data (as shown in the following figure).

The next two options (Adjustments and Load Transfers into) work in combination with each other. Your selections for these two options will determine what happens with the data being imported.
IMPORTANT: Please review the Adjustments for Transfers \ topic prior to making your selections for the Adjustment and Load Transfers into options.
Check the Adjustment checkbox (as shown in the following figure).

Do one of the following.
To load transfers into a Case or into multiple cases:
Check the Load Transfers into checkbox.
Select either Single Case or Multiple Cases.
Single Case: Use this option if you are loading transfer data into a single case (you had selected a Case in step 6).
Multiple Cases: Use this option if you are loading transfer data for more than one case (you did not select a Case in step 6).
To load transfers into the transfer tables, but not into any specific case(s):
Leave the Load Transfers into checkbox unchecked.
Ensure that the Load Tables, Load Data Table and Load Any Data Table checkboxes are all unchecked (as shown in Figure 996).
Click on the Select Data File Folder button to choose the folder where the Excel file (or .csv file) is located.
A Browse For Folder window opens.

Locate and select the Excel (or .csv) file.
Click OK to save your selection and close the Browser For Folder window.
You are returned to the main Data Importer window.
Double-click on the Excel or .csv file to open it and ensure that:
For Excel; the correct worksheet is active
For both Excel and a .csv file; the columns and data are in the correct format.
The specified format can be found under Import File Format for Transfers.
For more information regarding adding Editable Comments to your import file, see Editable Comments for Transfers.
Note: While working with Excel Files, it is common to have several Workbooks open at the same time. We recommended that you close all Excel Files and keep them closed, while working with Data Importer. Double-clicking on another Excel file while running the Data Importer will cause a message to appear stating that you need to close the workbook that is being used for the import.
(Optional) To view the log from the most recent import, click the View Log button.
Click the Import Data button to begin the import.
When the import finishes, a confirmation window opens.

Click OK to close the confirmation window.
Click on the View Log button to open the log file in Notepad.
If a transfer with a name is provided and a transfer with that name already exists in the database, the following error is generated. Hence if the transfer names are being provided, they need to be unique.

Note: If the 'Load transfer into' 'Single Case'/'Multiple Cases' is selected and 'Adjustment' is checked, adjustments are made to the existing transfers. However, duplicate transfers are not created in any scenario.
Close the log file when you are done viewing it.