Create a Display Setting from an Existing One
When you want to create a Display Setting derived from an existing one, you can use the "Duplicate" feature to create your new Display Setting from an existing one. When duplicating an existing Display Setting, you must provide a new, unique name for your duplicate before you can save it. Once saved, you can open the new duplicate and change whatever settings you want.
To create a new Display Setting from an existing one:
Click on Create or Edit Display Settings to open the panel.
Create or Edit Display Settings section
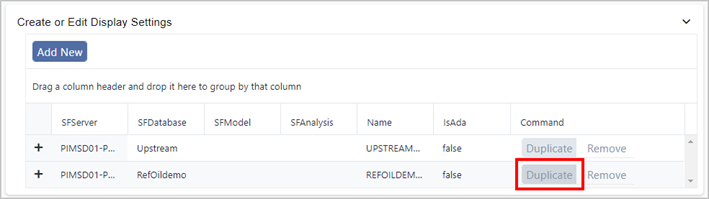
This section shows Display Settings that have already been created, if any, and provides options for creating new or duplicate setting templates, and modifying and removing existing ones.
In the list of existing Display Settings, find the one you want to use as a template for the new one.
Click the Duplicate for that Display Setting.
A Duplicate Setting panel opens.
Duplicate Setting panel
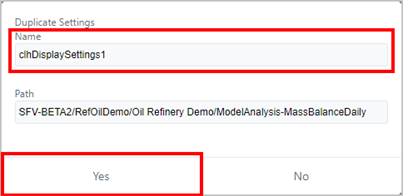
Click in the Name box to highlight the name of the setting you need to duplicate.
Type a unique name for your new Display Setting.
NoteNote that you cannot change any of the Path settings; these settings are automatically duplicated.
Click Yes to save the new Display Setting.
Now you are ready to start defining the new Display Setting.
Scroll down to the Create or Edit Display Settings section again.
Find the Display Setting you just added and click on its + expand icon.
A list of available Templates opens. You can drill-down into each Template to define what attributes are included in the Display and Element Detail panels.
Display Setting - List of Templates
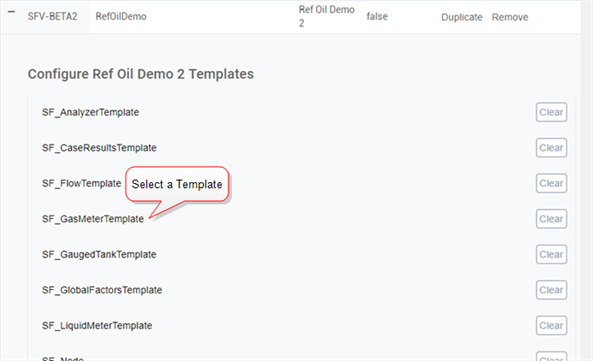
Click on a Template name to open the panel of items that can be defined.
You can select the Attributes that appear in the Quick Summary section of the Element Details panel, and configure the color that represents each one in the Quick Summary graphical representation of those element attributes. In addition, you can select the Attribute you want defined to display as the Object Status of an Element and the statistical test factor to use for the Quick Index display.
emplate Settings that can be defined
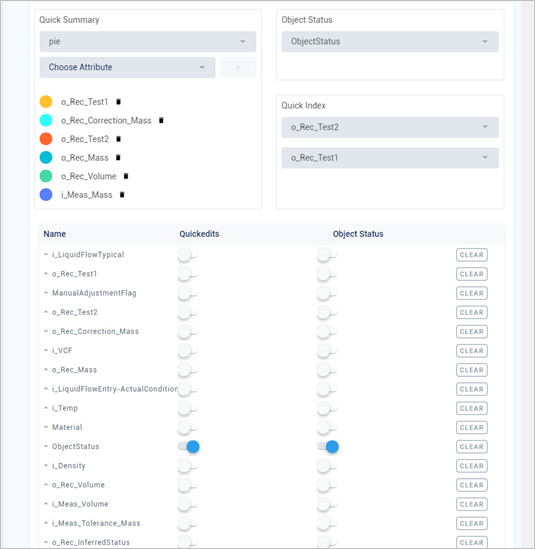
Define the settings to use for the selected template. You can define as many Elements, and their Attributes, as needed for the type of analysis review you need to do.
- Quick Summary Settings - these settings are reflected in the Element Details, Quick Summary panel.
- Object Status Setting - this setting is reflected in the Display when you rest your mouse pointer over an Element. It is also reflected in the Element Display, Quickedits panel under the Quickedits panel.
- Quick Index Settings - these settings are reflected in the Element Details, Index Summary graph as well as in the Adjustments panel that displays for Element Attributes, when applicable.
- Quickedits Settings - these settings are reflected in the Element Details, Quickedits panel. They are also reflected in the Display panel when you rest your mouse pointer over an Element and click on the 'Select a Quickedit' down-arrow.
- Diagnostic Index Settings - these settings are reflected in the Diagnostic panel under the Index tab. They are applied to only those Attributes that are set up under Settings. These settings are set by default based on the test selected.
- Aspect Type Settings - these settings are reflected in the Diagnostic panel under the Index tab. They are applied to only those Attributes that you set up under Settings. These are customizable settings you can use in lieu of the Diagnostic Index settings.
- Attribute Settings - these settings are reflected in the Diagnostic panel under the Index tab. They are applied to only those Attributes that you set up under Settings.
When finished, click on the Template's "-" collapse icon to collapse the view.
Your display settings are automatically saved.
Repeat the steps (beginning with step 11) for each Template you want to define in your Display Setting.
When you are finished defining all the templates for the Display Setting, you are ready to apply your new setting to the associated Model display(s). See Assign Display Settings under SFHub Visualizer or Apply Display Settings under SFAdmin, for more details.
If you are finished configuring settings:
- SFHub Admin: Close the SigmafineVisualizer® Settings panel.
- SFHub Visualizer: Click on the SFHub Visualizer link at the top of the Settings panel.
Your setting is automatically saved.
tipSFHub Visualizer users changing their own display settings may need to reload the Display to see the changes take affect.