Create New Attributes
For each Element template, the new Attributes are required to support the Quality Tracking analysis must be added.
Note: The hereafter steps are not required in Case the quality tracking library has been installed on the selected database (see paragraph Sigmafine Load Library Utility).
Analyzers
To create new analyzer attributes:
In the System Explorer navigation pane, select Library.
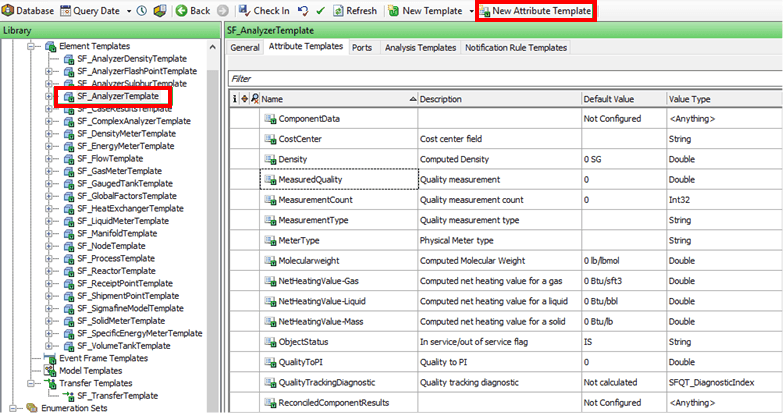
In the Library tree, expand Templates > Element Templates.
Locate and select one of the analyzer templates.
Click on the Attribute Templates tab.
Click the New Attribute Template button.
Create the MeasurementType Attribute as follows:
For Name select MeasurementType.
For Description select Quality measurement type.
For Default UOM select \<None>.
For Value Type select String.
For Categories select SF_AnalysisInput.
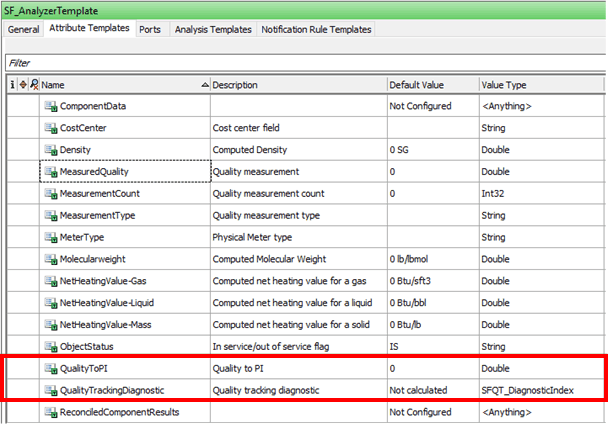
 EXAMPLE: Attribute Templates - Create MeasurementType attribute
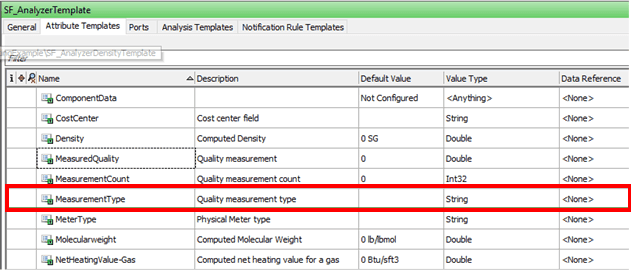
Create the MeasuredQuality Attribute as follows:
For Name select MeasuredQuality.
For Description select Quality measurement.
For Default UOM select \<None>.
For Value Type select Double.
For Categories select SF_AnalysisInput.
EXAMPLE: Attribute Templates - Create MeasuredQuality attribute
Create the MeasurementCount Attribute as follows:
For Name select MeasurementCount.
For Description select Quality measurement count.
For Default UOM select 0.
For Value Type select Int32.
For Data Reference select PI Point.
EXAMPLE: Attribute Templates - Create MeasurementCount attribute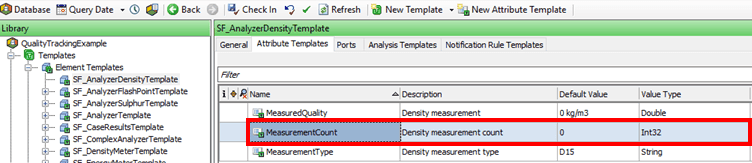
With PI Point selected, click on the Settings button to open the PI Point Data Reference window.
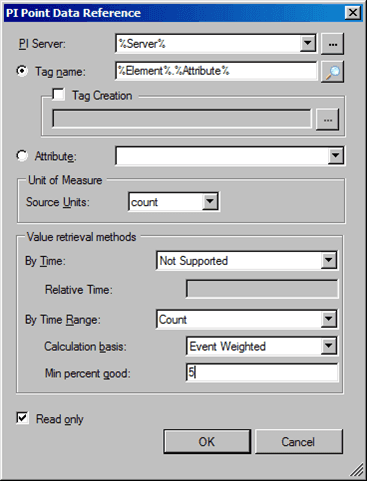
Configure the PI Point Data Reference as shown in Figure 1318.
For PI Server select %Server%.
For Tag name type or select %Element%, %Attribute%.
For By Time select Not Supported.
For By Time Range select Count
For Calculated basis select Event Weighted.
For Min percent good type 5.
If not checked, check the Read only checkbox.
Click OK to save the entries and close the window.
You are returned to the System Explorer window.
Under the Attribute Templates tab, verify that the QualityToPI Attribute exists.
If it does not exists, create it and add the required categories.
Create the QualityToPI attribute
For Name select QualityToPI.
For Description select Quality Value Calculated by QualityTracking written to PI.
For Categories select SF_AnalysisOutput;SF_QualityResults.
For Default Value select 0.
For Value Type select Double.
Add the required categories.
Flows, Tanks and Transfers
Flows
To create new flows attributes:
In the System Explorer navigation pane, select Library.
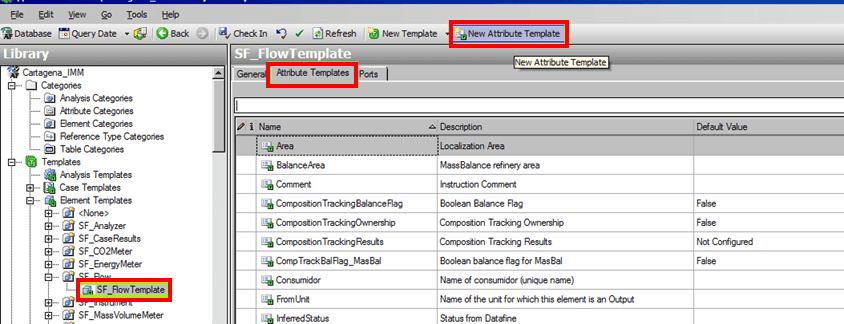
In the Library tree, expand Templates > Element Templates > SF_Flow.
Select SF_Flow_Template.
Click on the Attribute Templates tab.
Click the New Attribute Template button.
Create the QualityTrackingBalanceFlag Attribute as follows:
For Name select QualityTrackingBalanceFlag.
For Description select Boolean quality tracking flag.
For Default Value select False.
For Value Type select Boolean.
EXAMPLE: Attribute Templates - Create QualityTrackingBalanceFlag attribute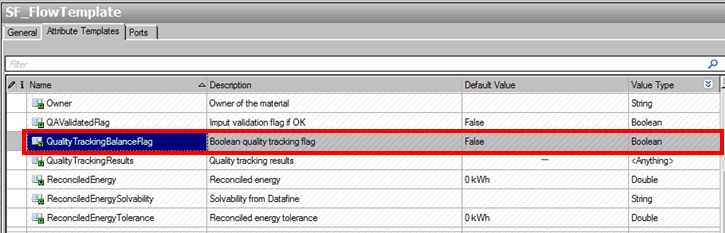
Create the QualityTrackingResults Attribute as follows:
For Name select QualityTrackingResults.
For Description select Quality tracking results.
For Categories select SF_AnalysisInput; SF_AnalysisOutput; SF_CompositionTracking; SF_QualityResults.
Leave Default Value empty (null).
For Value Type select \<Anything>.
EXAMPLE: Attribute Templates - Create QualityTrackingResults attribute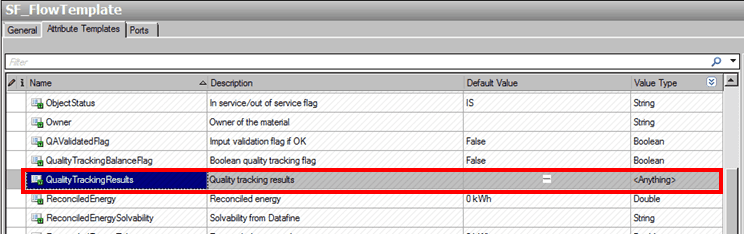
Create the GenealogyTrackingResults Attribute as follows:
For Name select GenealogyTrackingResults.
For Description select Quality tracking genealogy results.
For Categories select SF_AnalysisOutput; SF_QualityResults.
Leave Default Value empty (null).
For Value Type select \<Anything>.
EXAMPLE: Attribute Templates - Create GenealogyTrackingResults attribute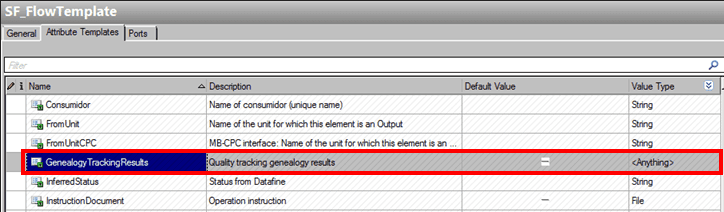
Tanks
To create new tank attributes:
In the System Explorer navigation pane, select Library.
In the Library tree, expand Templates > Element Templates.
Select SF_TankTemplate.
Click on the Attribute Templates tab.
Click the New Attribute Template button.
Add the following categories to the following attributes:
Note: Ensure that the MixingModel Attribute already exists. If it does not, create it using the steps found under Flows.
Tanks - Add Categories to Attributes
Attribute Categories MixingModel SF_AnalysisInput CompositionTrackingResults SF_AnalysisOutput QualityTrackingResults SF_AnalysisOutput; SF_QualityResults GenealogyTrackingResults SF_AnalysisOutput; SF_QualityResults In the Element Templates tree, select each tank template and repeat steps 3 through 6 for each.
Transfers
To create new transfer attributes:
- In the System Explorer navigation pane, select Library.
- In the Library tree, expand Templates > Transfer Templates.
- Select SF_TransferTemplate.
- Click on the Attribute Templates tab.
- Click the New Attribute Template button.
- Use the steps found under Flows to add the same Attributes to the 'SF_Transfer Template' as you added to the 'SF_Flow_Template'.
Nodes, Receipts Points and Shipments Points
Nodes
To create new node attributes:
- In the System Explorer navigation pane, select Library.
- In the Library tree, expand Templates > Element Templates > SF_Node.
- Select SF_NodeTemplate.
- Click on the Attribute Templates tab.
- Click the New Attribute Template button.
- Create the QualityTrackingBalanceFlag Attribute as follows:
- For Name select QualityTrackingBalanceFlag.
- For Description select Boolean quality tracking flag.
- For Default Value select False.
- For Value Type select Boolean.
Receipts Points
To create new receipts points attributes:
- In the System Explorer navigation pane, select Library.
- In the Library tree, expand Templates > Element Templates > SF_ReceiptPoint.
- Select SF_ReceiptPointTemplate.
- Click on the Attribute Templates tab.
- Click the New Attribute Template button.
- Create the QualityTrackingBalanceFlag Attribute as follows:
- For Name select QualityTrackingBalanceFlag.
- For Description select Boolean quality tracking flag.
- For Default Value select False.
- For Value Type select Boolean.
Shipments Points
To create new shipments points attributes:
- In the System Explorer navigation pane, select Library.
- In the Library tree, expand Templates > Element Templates > SF_ShipmentPoint.
- Select SF_ShipmentPointTemplate.
- Click on the Attribute Templates tab.
- Click the New Attribute Template button.
- Create the QualityTrackingBalanceFlag Attribute as follows:
- For Name select QualityTrackingBalanceFlag.
- For Description select Boolean quality tracking flag.
- For Default Value select False.
- For Value Type select Boolean.