Editing an Integration Rule
To edit an Integration Rule (VIRTUAL Dataset):
Run the Integration Framework Configurator.
Click on your Windows Start button to display the list of installed software applications.
From the list of software applications, select Integration Framework > Configurator.
The Integration Framework - Configurator window opens.
From the Configured Data Server list, double-click on the VIRTUAL channel object to expand the list of Integration Rule Groups.
Click on the Integration Rule Group that contains the rule you want to edit.
Locate and right-click on the Integration Rule, then select Edit.
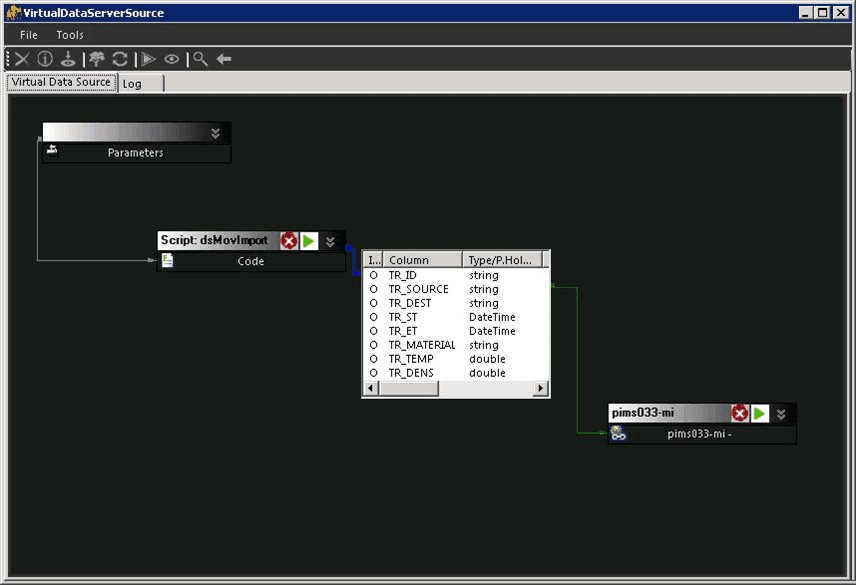
The Virtual Data Server Source window opens.
In the toolbar, click on the
 Tree icon to show the list of existing datasets.
The Tree icon works as a toggle to display and hide the left side Dataset selection pane, allowing you a larger area on the right in which to configure the Integration Rule.
To add a Dataset or Tool to the Integration Rule, drag a dataset from the left panel into the 'Virtual definition area', (the larger pane on the right).
The Virtual definition area on the right is the Integration Rule graphic dashboard where you draw the integration work-flows. The work-flows are created by dragging the Datasets and Tools from the tree on the left to inside the graphic dashboard. Once a Dataset or Tool has been dropped onto the graphic dashboard, the selected item appears as a box. For more details about the boxes see Adding an Integration Rule (VIRTUAL Dataset).
Connect a box to another by dragging from the center of the source box to the center of the destination box.
Once a connection has been made, a colored arrow is drawn appears indicating the direction of the connection.
A connection between two boxes indicates that the results (if any) from the source will be passed to the destination. The receiving Dataset will use the contents arriving from the source as input data. How data is consumed and/or manipulated in the destination Dataset is not known until the Integration Rule is defined. However, it should be configured in the receiving Dataset using its specific business logic.
For more information on how to graphically define your Integration Rule, please see the sample found under Integration Rule Example.
To remove a Dataset or Tool from the Integration Rule, right-click on the object in the graphic dashboard and select Remove.
To see a preview of how the rule is going to work, click the Preview icon.
The Preview feature forces a manual execution of the Integration Rule limited to a certain number of rows. The number of rows is defined by setting a default using the Set Preview icon.
To see information of any newly created or existing Integration Rule, click the Info icon.
When you are satisfied with your Integration Rule changes, click the Save icon to save it to Integration Framework.
To manually run the rule now, click the Run icon.