Configuring - Previous Value Data Reference
To configure the Previous Value Data Reference:
In the Elements section of the navigation panel, select the respective Element and go to the Attributes tab.
Select the Attribute Name for which the Previous Value Data Reference needs to be configured.
Click on the Data Reference menu arrow and select Previous Value.
Below the Data Reference name, click on the Settings button.
The Previous Value Configuration Dialog window opens, as shown in the following image.
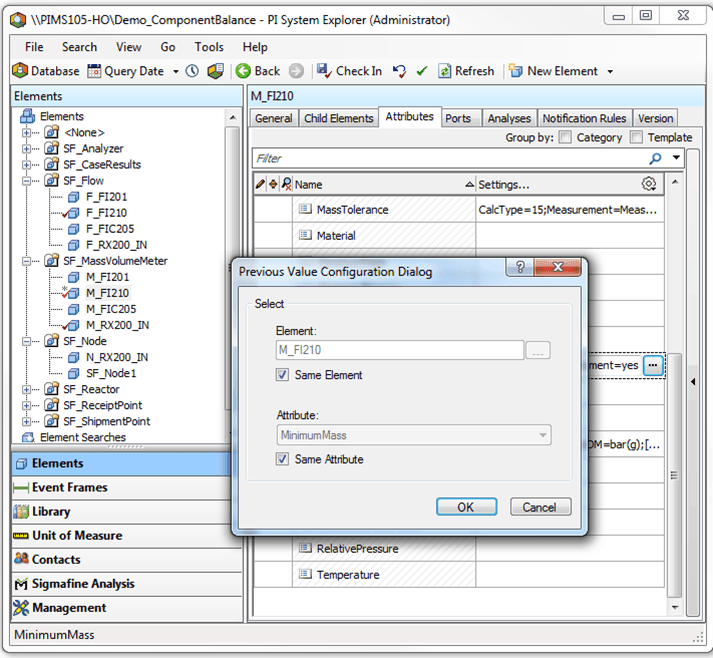
The following table provides a description of the input boxes.
Input Box / Button Description Element Select the Element from which you want to bring in the value. Check the ‘Same Element’ box to choose the same element. Attribute Select the Attribute from which you want to bring in the value. Check the ‘Same Attribute’ box to choose the same attribute. Select the Element and Attribute values using one of the following configurations.
Same Element and Same Attribute

This configuration picks up the value from a previous Case of the same Element and same attribute.
To use this configuration:
- Check the Same Element checkbox.
- Check the Same Attribute checkbox.
- Click OK to save your options and close the window.
Same Element and Different Attribute
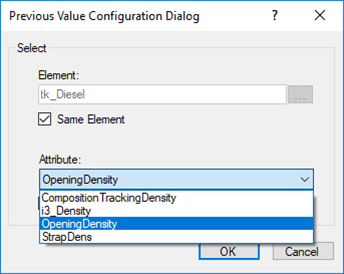
This configuration picks up the value from previous Case of same element, but any other Attribute of this Element which has the same UOM.
To use this configuration:
- Check the Same Element checkbox.
- Uncheck the Same Attribute checkbox (if it is checked).
- Click the Attribute down-arrow and select the Attribute you want.
- Click OK to save your options and close the window.
Different Element and Same Attribute

This configuration picks up the value from previous Case of a different element, but same attribute.
For this configuration, the Element selected must have an Attribute with the same name and UOM.
To use this configuration:
- Uncheck the Same Element checkbox.
- Check the Element
 ellipsis button and select the Element you want from the Element Search window.
 - Check the Same Attribute checkbox.
- Click OK to save your options and close the window.
Different Element and Different Attribute

This configuration picks up the value from previous Case of a different element, and different attribute.
To use this configuration:
Uncheck the Same Element checkbox.
Check the Element
ellipsis button and select the Element you want from the Element Search window.Uncheck the Same Attribute checkbox (if checked).
Click the Attribute down-arrow and select the Attribute you want.
Based on the Element you have selected, only the Attributes with matching UOM are available in the menu.
Click OK to save your options and close the window.
Make sure you select the proper names prior to clicking OK. If at any time a proper Element or Attribute is not selected and you click OK, one or both of the following messages appear.

After the Data Reference is configured, the Attribute shows the error below. This is expected, since the configuration is being done outside Case context.

The configuration string for the Data Reference, for Same Element & Same Attribute is shown below.

Assign the initial value for the Previous Value Data Reference
After the data reference configuration has been completed, you need to make sure that there is an initial value assigned to the 1st case.
In the System Explorer navigation pane, go to the Model Analyses section and select this Element under a case.
The Attribute still shows the same error in all the Cases in some situations (like Same Element & Same Attribute) since there is no initial value present in the first case.

In the Value column, double-click on the error message to make the cell editable, as shown in the following image.

Assign the initial value by typing it in the editable box, as shown in the following image.

Press Enter.
A Comment window appears.
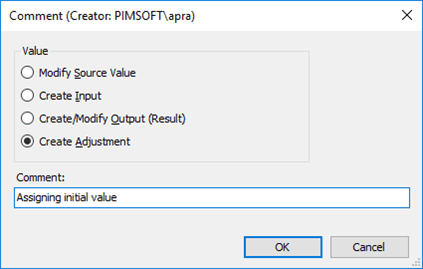
Select the Create Adjustment option.
(Optional) In the Comment box, type your comment.
Click OK to save your settings and close the window.
The following image depicts how the Attribute appears, after the initial value is assigned.

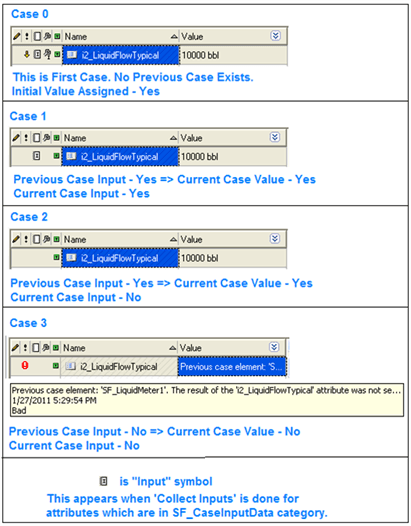
Previous Value Data Reference can be used for a density attribute. Density is configured to get the value from the previous case. When a new density value is known, it can be created as an adjustment in the case, so that from the next Case onward, the new density is carried forward.
For the Previous Case Data Reference to grab a value from the previous case, the Attribute of the previous Case has to have an ‘Input’ result. This happens when the Attribute is in the SF_CaseInputData category and the Collect Inputs has been completed.

Examples of Previous Value Data Reference Configurations