Configuring the Sequence
This describes how to configure the sequence of the execution. In other words, the sequence in a sorted list of steps that is configurable by users. Each step identifies an execution of one analysis from the available analyses. The list is totally configurable, and users have all of the options to configure the workflow of the execution.
The form presents the configured sequence in a table.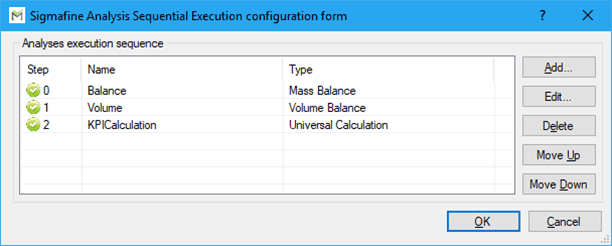
The list of the columns in the form are as follows:
- ICON: There are 2 possible icons:
- GREEN LIGHT: This means that step is enabled for execution (according to the step configuration).
- RED LIGHT: This means that the step has been disable in the sequence. So, the engine will skip this step.
- STEP: This is the number of execution in the sequence. Lower “Step” values get executed first. The list starts from the value 0. The step with STEP ID = 0 will be the first executed, then the Sequential goes to step with ID = 1 and so on, until the last configured step.
- NAME: This is a label/identifier provided by the user for the step according to what specified in configuration
- TYPE: This identifies the Analysis Rule selected for the step (one of the registered Analysis Rule in the Sigmafine system).
The main configuration form makes available several actions for editing the list presented in the Sequence Definition Buttons table seen below:
Sequence Definition Buttons
| Button | Description |
|---|---|
| Add... | Adds a new step to the sequence. Steps are added to the bottom (tail) of the execution sequence. When selected, it presents the STEP configuration form that is detailed in next sections. |
| Edit... | Edits the selected step. Firstly, the user should select the step in the table, and then, they should select the EDIT button to edit the selected step. Without first selecting the step, the EDIT button does not work. When “Edit…” is selected, it presents the STEP configuration form detailed in next sections. |
| Delete | Deletes the selected step. Firstly, the user should select the step in the table, and then, they should select the DELETE button to remove the selected step. Without first selecting the step, the DELETE button does not work. Once deleted, the step configuration is lost, unless the user exits from the main without with the CANCEL button. |
| Move Up / Down | Changes the ID / execution sequence of the selected step. If user selects the step and then the “MOVE UP” button, the configuration form will decrease the STEP value, moving the step up in the execution sequence. By selecting the “MOVE DOWN” button, the configuration form will increase the STEP value, moving the step down in the execution sequence. Use the combination of these buttons to define the order of your sequence. |