Initializing Components for Self-Calculated Inventory
For inventory elements without an attached analyzer Element in the Model you must set the reconciled component data Attribute manually before these elements can participate in the component mass balance. You can do this initialization with the Component Data Reference after the first component mass balance analysis Case is created.
When used for the purpose of inventory initialization, the Component Data Reference launches the Component Viewer for Inventory. The Viewer is used to present a visual representation of the composition tracking data set.
To configure the reconciled component results Attribute for tanks that do not have an attached analyzer:
Open System Explorer or the Modeler and browse to the elements collection within the initial Case for Component balance.
For the Modeler, you must be in Run mode.
Select the inventory Element to initialize.
Click the Attributes tab.
Select the reconciled component results attribute.
If you are using the Sigmafine Element templates, this Attribute name is o_Rec_ComponentData and it exists in the following templates:
- SF_VolumeTankTemplate
- SF_GaugedTankTemplate
In the data reference column of the attribute, click the Data Reference down-arrow and select the Components data reference.
 EXAMPLE: Step 5 in System Explorer
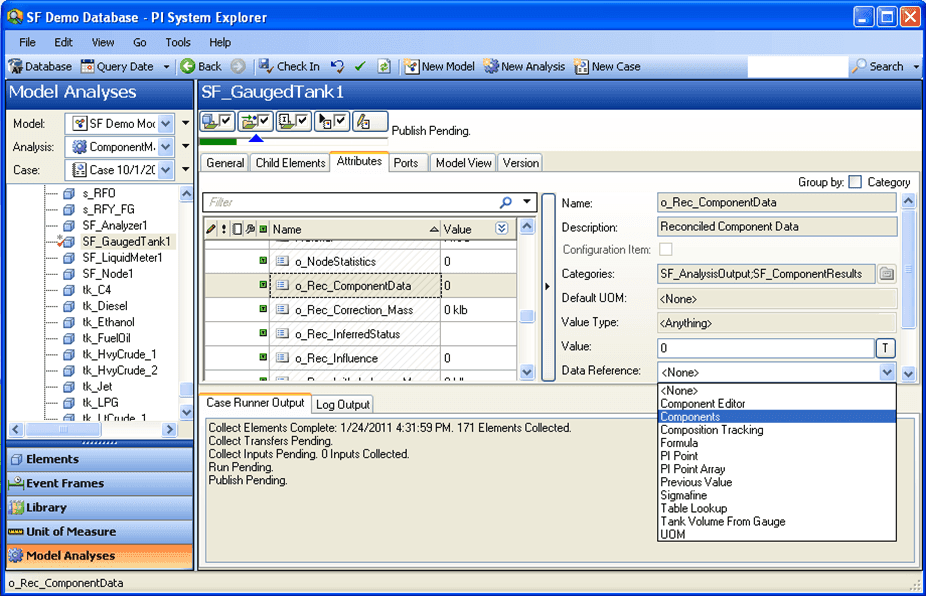
Note: This step is the same in Modeler and can be done via the AF Property window of modeler.
After you select the data reference, this data reference requires no further configuration (you do not have to click on "Settings").
Double-click the Attribute value.
The Component Viewer for Inventory window opens.
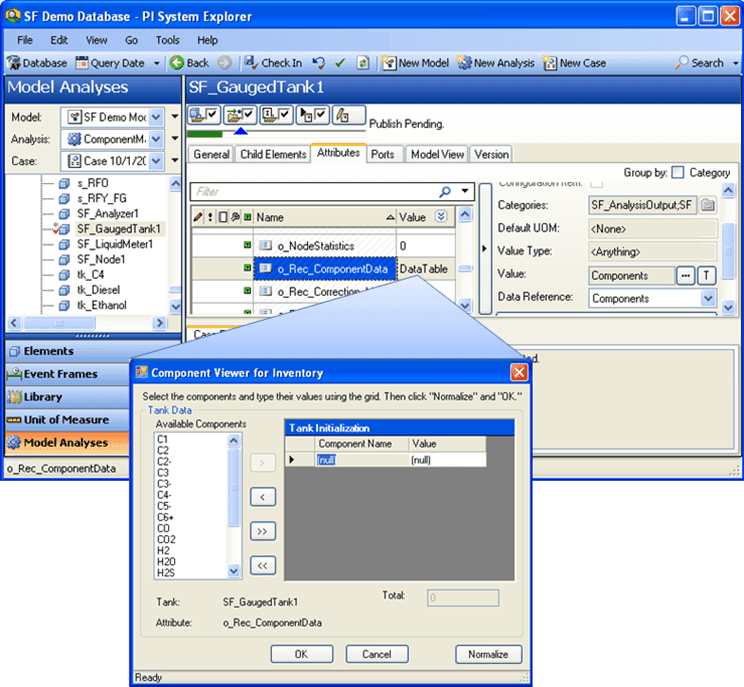
You can use the Component Viewer for Inventory only in the context of a Case and in association with the Component Balance Analysis Rule.
Component Viewer for Inventory Fields and Buttons
Field / Button Description Available Components Select a Component. The Component list is based on the table specified in the SF_Component Table. Component Name Read-only field displays name of the component. Enter Data In Select how you are entering your data: Mass (Volume) or Percent. Volume / Mass Enter the fraction of the component. Normalize Click to normalize the entered values. Normalization is not required. Total Read-only field displays the total from the table. OK Click to close and save your changes. Cancel Click to close without saving changes. To edit or view (initialize) composition data in an inventory:
Click the
 Add button to move material names into Tank Initialization.
As you move them, the Viewer also moves the material density from the material table. The Viewer uses the analysis rule configuration string to determine the name of the material table and the density column within the table.
To remove a material name from Tank Initialization, select the material under Tank Initialization and click the
 Remove button.
Under the Tank Initialization Value column, enter the component values as decimal fractions.
When you are finished, click Normalize for the Viewer to normalize your entries to the net volume or measured mass of the tank.
If the total differ by more than 1% from unity, the following warning message appears.

4. Click OK in the error message box to normalize.
You are returned to the Component Viewer for Inventory window.
Click OK to close the window.
Do one of the following: If you are using Modeler, on the File menu, click Save.
If you are using System Explorer, Check In your data into the database.
If you are using Modeler, select File > Save.
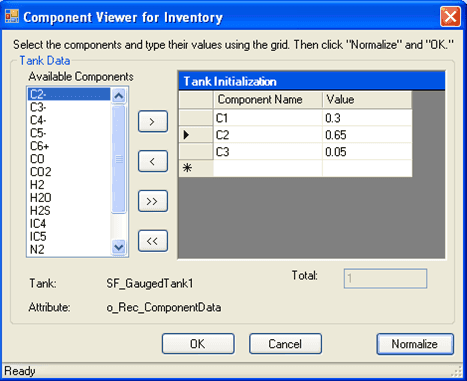
EXAMPLE: Components that have been initialized
Note: The Sigmafine Component Mass Balance analysis requires that the previous Case end time be the start time of the next case. This is because inventory information collected from the previous case (opening levels, for example) does not result in a valid calculation unless the start\end times are the same.
Use the Case Runner to run all analysis steps, or you may choose to run each step separately and view the log and results tabs to see the results at each step of the analysis.
Click the buttons in the Case Runner to execute the analysis.
If the Case Runner is not visible, Click the View menu and then Case Runner.
If the checkboxes are not visible, right-click on the Case Runner and select Configure to customize the buttons.
To view the log and results tabs to see the results each step of the analysis:
On the Log tab, view any errors or messages from the analysis and Gross error analysis checks (if enabled).
On the Results tab, examine the results of the Component Mass Balance analysis.
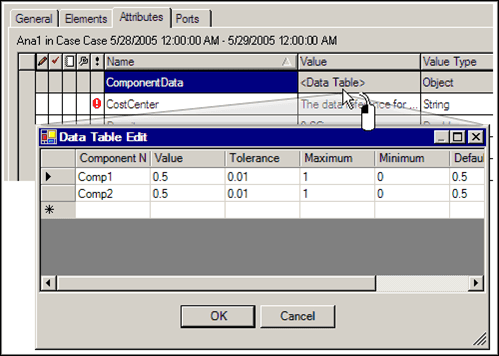
For Attributes that contain the component data table and results, double-click <Data Table> in the Value column to open a table view.